Table of Contents
This page contains all the information required to start working with the nRF5 SDK for Thread and Zigbee: from the supported boards to the procedures for building and running. Most of the sections are common to both Thread and Zigbee protocols.
Hardware support and requirements
This section describes hardware elements supported or required by the nRF5 SDK for Thread and Zigbee.
Supported boards for Thread and Zigbee
The nRF5 SDK for both Thread and Zigbee is compatible with the configurations mentioned in the following table.
| SoCs | Boards | SoftDevices |
|---|---|---|
| nRF52840_xxAA | PCA10056 | S140 v6.1.1 |
| nRF52840_xxAA | PCA10059 | S140 v6.1.1 |
Thread nRF52811 support
The Thread protocol supports the nRF52811 SoC.
Because of the memory constraints, multiprotocol features are not supported when using nRF52811. For this reason, the SoftDevice is not used. Moreover, the support for Joiner and Commissioner in nRF52811 is not available through the regular SoC architecture, but it is possible in the RCP mode.
| SoCs | Boards | SoftDevices |
|---|---|---|
| Simulated nRF52811_xxAA on nRF52840_xxAA | PCA10056 and PCA10059 | S112 v6.1.0 supported through nRF5 SDK. |
| nRF52811_xxAA | PCA10068 (internal) | S112 v6.1.0 supported through nRF5 SDK. |
Peripheral requirements
See the tables in this section for the overview of peripherals used by the nRF5 SDK for Thread and Zigbee. These peripherals cannot be used directly by an application.
The peripherals for the 802.15.4 Radio Driver are always used, regardless of the protocol and the SoftDevice. The SoftDevice peripherals are used in the multiprotocol solutions (for details, see S140 SoftDevice hardware peripherals usage).
Thread peripheral requirements
Thread peripheral requirements are different for nRF52840 and nRF52811.
OpenThread API can be used to access the hardware random number generator and temperature sensor.
To use the logger module, use the RTT backend. Depending on the OpenThread platform library, UART0 or USB might be reserved by the Thread stack. Do not use the logger backend using those peripherals.
- Note
- The resources mentioned in the tables in this section are reserved by all the OpenThread libraries delivered with this SDK, unless marked as optional. The optional serial transport peripherals are reserved by the corrensponding library variants. You can specify other instances of some peripherals such as Timers, PPIs, SWI, UART, SPI, or USB, and then rebuild the libraries. Refer to platform-config.h and nrf_802154_config.h to view the current configuration.
Thread nRF52840 peripheral requirements
The following table shows the hardware requirements of the OpenThread stack for nRF52840. SoftDevice usage is provided for the multiprotocol features.
| Peripheral | OpenThread stack Radio only | OpenThread stack FTD and MTD | 802.15.4 Radio Driver | SoftDevice | Comment |
|---|---|---|---|---|---|
| TIMER0 | X | X | Used by the radio driver if frame timestamping is enabled. | ||
| TIMER1 | X | ||||
| RTC2 | X | X | X | ||
| UART0 | Optional (Default) | Optional (Default) | Used by NCP and CLI compiled with UART libraries (default setting). | ||
| USB | Optional | Optional | Used by NCP and CLI compiled with USB libraries. | ||
| SPIS0 | Optional | Optional | Used by NCP compiled with SPI libraries. | ||
| RADIO | X | X | |||
| SWI1/EGU1 | X | ||||
| SWI2/EGU2 | X | SoftDevice Event IRQ handler. Used for both protocol events and SoC events. | |||
| SWI3/EGU3 | X | Single Phy: Only Channel 15. Multiprotocol: channels 0, 1, 2, 15. | |||
| SWI5/EGU5 | X | ||||
| RNG | X | X | X | ||
| CRYPTOCELL | X | ||||
| PPI | X | Channels 6-12 for driver core. Channels 0-5 for the debug mode. | |||
| PPI group | X | Group 0 used by the driver core. | |||
| GPIOTE | Optional | Two GPIOTE channels selected by user: 1 for PA, 1 for LNA. API is provided for configuring the FEM in both protocols. | |||
| TEMP | X | X | Accessible using OpenThread API. | ||
| CLOCK | X | Configured by the radio driver during radio operations. |
Thread nRF52811 peripheral requirements
The following table shows the hardware requirements of the OpenThread stack for nRF52811, in simulated and standard versions. Only OpenThread MTD and radio-only variants are available for this chip. Due to insufficient memory resources, multiprotocol features are not supported, and SoftDevice is not used.
| Peripheral | OpenThread stack Radio only | OpenThread stack MTD only | 802.15.4 Radio Driver | Comment |
|---|---|---|---|---|
| TIMER0 | X | Used by the radio driver if frame timestamping is enabled. | ||
| TIMER1 | X | |||
| RTC0 | X | X | X | |
| UART0 | Optional (Default) | Optional (Default) | Used by NCP and CLI compiled with UART (default) libraries. | |
| SPIS0 | Optional | Optional | Used by NCP compiled with SPI libraries. | |
| RADIO | X | |||
| SWI0/EGU0 | X | Single Phy: Only channel 15. | ||
| RNG | X | X | ||
| PPI | X | Channels 6-12 for driver core. Channels 0-5 for the debug mode. | ||
| PPI group | X | Group 0 used by the driver core. | ||
| GPIOTE | Optional | Two GPIOTE channels selected by user: 1 for PA, 1 for LNA. API is provided for configuring the FEM in both protocols. | ||
| TEMP | X | Accessible using OpenThread API. | ||
| CLOCK | X | Configured by the radio driver during radio operations. |
Zigbee peripheral requirements
See the following table for the peripheral requirements for the Zigbee protocol running on an nRF52840 SoC. SoftDevice usage is provided for the multiprotocol features.
| Peripheral | Zigbee | 802.15.4 Radio driver | SoftDevice | Comment |
|---|---|---|---|---|
| TIMER0 | X | X | Used by the radio driver if frame timestamping is enabled. | |
| TIMER1 | X | |||
| TIMER3 | X | |||
| RTC0 | X | |||
| RTC2 | X | X | RTC2 used for sleep through radio driver API. | |
| UART0 | X | Only for CLI/LOG over UART. | ||
| USB | X | Only for CLI/LOG over USB. | ||
| RADIO | X | X | X | |
| SWI1/EGU1 | X | |||
| SWI2/EGU2 | X | SoftDevice Event IRQ handler. Used for both protocol events and SoC events. | ||
| SWI3/EGU3 | X | Single Phy: Only channel 15, without ISR. Multiprotocol: channels 0, 1, 2, 15 with ISR. | ||
| SWI5/EGU5 | X | |||
| RNG | X | X | ||
| CRYPTOCELL | ||||
| ECB | X | X | ||
| PPI | X | Channels 6-12 for driver core. Channels 0-5 for the debug mode. | ||
| PPI group | X | Group 0 used by the driver core. | ||
| GPIOTE | X | Two GPIOTE channels selected by user: 1 for PA, 1 for LNA. API is provided for configuring the FEM in both protocols. |
For information about the Zigbee stack memory layout and requirements, see Zigbee memory layout and requirements.
Running precompiled examples
You do not need to install the full toolchain to quickly test an example. The only thing you need is to download and install the latest version of nRF5x Command Line Tools from the nRF52840 product website. Once you install these, you can program a precompiled example application to your development board.
The zip version of the SDK provides precompiled hex files for most of the supplied examples. For examples that require a SoftDevice, the SoftDevice must be flashed separately.
To program a precompiled example:
- Download the latest
nRF5-SDK-for-Thread-and-Zigbeerepository file in zip format from the SDK download page. - Extract the zip file to the directory that you want to use to work with the SDK.
- Depending on the board you are using:
- PCA10056 or PCA10068:
- Connect the J-Link USB of the board to your computer with a J2 connector. The computer will recognize it as a standard USB drive.
- In the SDK directory, navigate to the example that you want to test and open the
hex subdirectory. For example, for the Thread CLI Example, navigate toexamples/thread/cli/uart/hex, whereas for the Zigbee CLI Agent example, navigate tonrf5/examples/zigbee/experimental/cli/cli_agent_router/hex. - Select the hex file that corresponds to your development board and copy it to the board J-Link USB drive.
- PCA10059:
- Flash the dongle as described in the Building examples section.
- PCA10056 or PCA10068:
To test the example, follow the testing instructions in the example documentation (Thread and Thread+BLE examples or Zigbee and Zigbee+BLE examples, respectively). Depending on the example that you programmed, it might be sufficient to observe the LEDs on the board. Other examples require you to connect to the board through the native USB, SPI, or a phone app.
Installing the toolchain
You must install a set of tools to set up the build environment. The setup process depends on your preferred toolchain and operating system.
See the following table for the toolchains and IDEs supported by both protocols, and the following sections for detailed installation instructions.
| Toolchain/IDE | Version | Operating system |
|---|---|---|
| GCC ARM Embedded Toolchain | 7-2018-q2-update | Linux, Windows, MacOS |
| IAR Embedded Workbench | 7.80.4 | Windows |
| Keil µVision 5 MDK | 5.25 | Windows |
| SEGGER Embedded Studio | 4.12 | Windows |
Precompiled libraries
The nRF5 SDK for Thread and Zigbee includes the following precompiled libraries for GCC, IAR, and Keil 5:
- Thread: precompiled OpenThread libraries.
- Zigbee: precompiled ZBOSS libraries.
In both cases, the SEGGER Embedded Studio project uses the libraries built with GCC.
Build environment based on GCC
The GCC ARM Embedded Toolchain is supported for both Windows and Linux.
Installing GCC on Linux
See the following table for the list of software required for setting up the build environment based on GCC ARM Embedded Toolchain on Linux.
| Download link | Recommended version | Installation notes |
|---|---|---|
| GNU ARM Embedded Toolchain | 7-2018-q2-update | Make sure to install in the default directory: /usr/local/gcc-arm-none-eabi-7-2018-q2-update.If you already have another version of arm-none-eabi installed, or have installed it in a different directory, you can modify the default path in the following file: <InstallFolder>/components/toolchain/gcc/Makefile.posix.You can also set the GNU_INSTALL_ROOT= environmental variable to point to the bin folder of GCC toolchain. |
| GNU Make | Latest version | Default build system on Debian/Ubuntu. Usually comes with the distribution. To check whether you have the make tool installed, run the following command:$ which make
make tool. |
| nRF5x Command Line Tools | Latest version | Includes SEGGER J-Link and nrfjprog tools.
|
| nRF5 SDK for Thread and Zigbee | v3.0.0 | Download and unzip the package. |
Installing GCC on Windows
See the following table for the list of software required for setting up the build environment based on GCC ARM Embedded Toolchain on Windows.
| Download link | Recommended version | Installation notes |
|---|---|---|
| GNU ARM Embedded Toolchain | 7-2018-q2-update | Make sure to install in the default directory: C:/Program Files (x86)/GNU Tools ARM Embedded/7 2018-q2-update.If you already have another version of arm-none-eabi installed, or have installed it in a different directory, you can modify the default path in the following file: <InstallFolder>/components/toolchain/gcc/Makefile.windows.You can also set the GNU_INSTALL_ROOT= environmental variable to point to the bin folder of GCC toolchain. |
| MinGW | Latest 32-bit version | Required to use the standard GCC compiler on Windows. Install the mingw-base and ensure that the 32-bit version is installed or that 32-bit libraries are available.See Installing make on Windows for information about the installation process. |
| make | Latest version | Available through MinGW. See Installing make on Windows for information about the installation process. |
| nRF5x Command Line Tools | Latest version | Includes SEGGER J-Link and nrfjprog tools. After the installation is complete, add nrfjprog installation directory (for example C:/Program Files (x86)/Nordic Semiconductor/nrf5x/bin/) to your system PATH variable.
|
| nRF5 SDK for Thread and Zigbee | v3.0.0 | Download and unzip the package. |
Installing make on Windows
The make tool, required to build GCC projects, is not natively available on Windows. However, you can use the MinGW package to install it:
- Run the downloaded MinGW binary and select a folder where the MinGW toolchain is to be installed. The recommended path is
C:/MinGW. When the first part of the installation is finished, the MinGW Installation Manager opens.
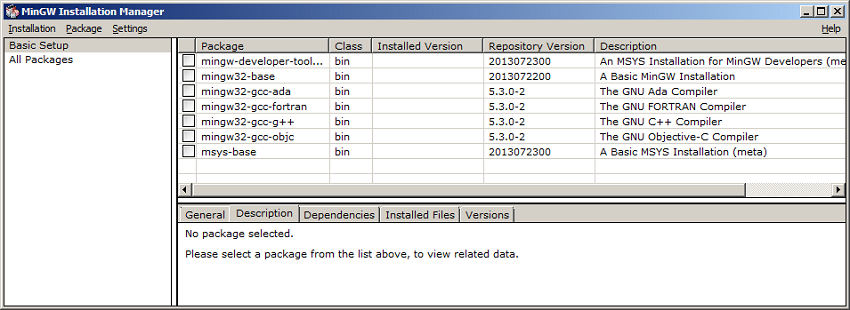 MinGW Installation Manager
- From the package list, select mingw32-base and msys-base.
- Click Installation -> Apply changes to install the selected items.
- Go to the Environment Variables of your system and edit the PATH variable. Append the existing string with the following two paths, each preceded by a semicolon.
C:/MinGW/binC:/MinGW/msys/1.0/bin
System reboot might be required for the new paths to work properly.
- After the installation process finishes, open the command prompt and verify that it succeeded. To do this, check that the Msys environment was set up correctly by running the following command: You will receive the following result:uname --operating-system
 System information
 - Additionally, check that the
maketool was installed correctly by typingmake --versionand pressing Enter. If there are no errors during installation, the following message is displayed:If you experience issues when running the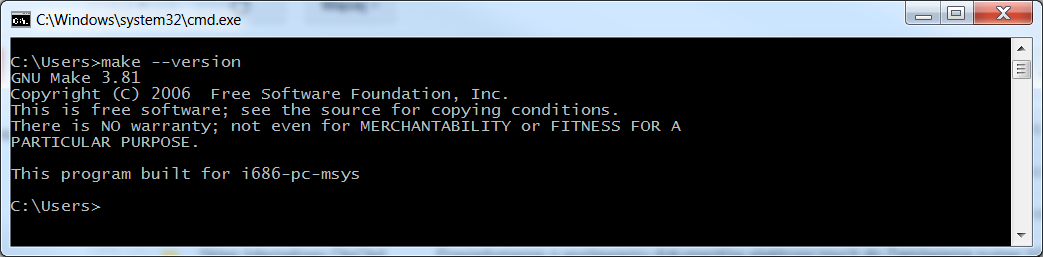 Version information
makecommand on Windows, make sure that you do not have any othermakeinstances from other toolsets like Cygwin or GnuWin32 in your PATH variable.
Build environment based on IAR
See the following table for the list of software required for setting up the build environment based on IAR Embedded Workbench on Windows.
| Download link | Recommended version | Installation notes |
|---|---|---|
| IAR Embedded Workbench | 7.80.4 | Download and follow the installation instructions. |
| nRF5 SDK for Thread and Zigbee | v3.0.0 | Download and unzip the package. |
Build environment based on Keil 5
See the following table for the list of software required for setting up the build environment based on Keil µVision 5 MDK on Windows.
| Download link | Recommended version | Installation notes |
|---|---|---|
| Keil µVision 5 MDK | 5.25 | Download and follow the installation instructions. |
| nRF5 SDK for Thread and Zigbee | v3.0.0 | Download and unzip the package. |
Build environment based on SEGGER Embedded Studio
SEGGER Embedded Studio (SES) is available for both Windows and Linux. However, by default the nRF5 SDK for Thread and Zigbee refers to the SES build environment on Windows.
See the following table for the list of software required for setting up the build environment based on SES on Windows.
| Download link | Recommended version | Installation notes |
|---|---|---|
| SEGGER Embedded Studio | 4.12 | Download and follow the installation instructions. |
| nRF5 SDK for Thread and Zigbee | v3.0.0 | Download and unzip the package. |
Required additional software for Thread protocol
You might also need to install the following tools when using the Thread protocol:
- Thread Border Router for Thread NCP/RCP Example.
- nRF Thread Topology Monitor for visualizing the Thread network.
Configuring SEGGER J-Link software
If you plan to use Thread CLI Example, Thread NCP/RCP Example with the Thread protocol, or Zigbee CLI Agent example with the Zigbee protocol, make sure you configure SEGGER J-Link by completing the following procedures:
- Disable Mass Storage Device – to avoid data corruption or data drops when you use the serial port.
- This is required due to a known issue in SEGGER's J-Link firmware, though this depends on the software version.
- Force Hardware Flow Control – to avoid potential race conditions related to the auto-detection.
- By default, SEGGER J-Link automatically detects at runtime whether the target is using Hardware Flow Control (HWFC). The automatic HWFC detection is done by driving P0.07 (Clear to Send - CTS) from the interface MCU and evaluating the state of P0.05 (Request to Send - RTS) when the first data is sent or received. If the state of P0.05 (RTS) is high, it is assumed that HWFC is not used.
Configuring SEGGER J-Link software on Windows
To disable the MSD and force the HWFC on Windows:
- Connect the board to your machine with a USB cable.
- Run
J-Link Commander. The configuration window appears. - From the Specify Target Device dropdown menu, select
NRF52810_XXAAorNRF52840_XXAA, depending on your board. - From the Target Interface & Speed dropdown menu, select
SWD. - Run the following commands:
- To disable the MSD: MSDDisable
- To force the HWFC: SetHWFC Force
- To disable the MSD:
- Power cycle the board.
Configuring SEGGER J-Link software on Linux
To either disable the MSD or force the HWFC on Windows, or do both:
- Connect the
NRF52810_XXAAorNRF52840_XXAAboard to your machine with a USB cable. - Run
JLinkExeto connect to the target. For example, forNRF52810_XXAA: ``` JLinkExe -device NRF52810_XXAA -if SWD -speed 4000 -autoconnect 1 -SelectEmuBySN [SEGGER_ID] ``` - Run the following commands:
- To disable the MSD: MSDDisable
- To force the HWFC: SetHWFC Force
- To disable the MSD:
- Power cycle the board.
Building examples
The procedure for building examples depends on the toolchain you are using:
- Building examples with GCC
- Building examples with IAR
- Building examples with Keil 5
- Building examples with SEGGER Embedded Studio
Building examples with GCC
To build an example with GCC, complete the following steps:
- Open Windows command line or Linux terminal.
- Navigate to the selected example directory, and then to the armgcc project directory, for example:
- Thread:
<InstallFolder>/examples/thread/cli/ftd/pca10056/blank/armgcc - Zigbee:
<InstallFolder>/examples/zigbee/light_control/light_bulb/pca10056/blank/armgcc
- Thread:
- Run the
makecommand in this directory. If the environment is set up correctly, the build process starts.
The build process produces the hex file inside the _build directory, for example:
- Thread:
<InstallFolder>/examples/thread/cli/ftd/pca10056/blank/armgcc/_build/nrf52840_xxaa.hex - Zigbee:
<InstallFolder>/examples/zigbee/light_control/light_bulb/pca10056/blank/armgcc/_build/nrf52840_xxaa.hex
Building examples with IAR
To build an example with IAR, complete the following steps:
- Open IAR Embedded Workbench.
- Select File->Open->Workspace... and navigate to the selected example directory.
- Open the selected workspace, for example:
- Thread:
<InstallFolder>/examples/thread/cli/ftd/thread_cli.eww - Zigbee:
<InstallFolder>/examples/zigbee/light_control/light_bulb/zigbee_light_bulb.eww
- Thread:
- Build the example with Project->Make.
You can program the nRF52840 Development Kit directly from IAR Embedded Workspace (Project->Download And Debug), or use nrfjprog as described in Running an example without the SoftDevice (for standard examples) or Running an example with the SoftDevice (for Thread multiprotocol examples).
Building examples with Keil 5
To build an example with Keil µVision 5, complete the following steps:
- Open Keil µVision 5.
- Select File->Open, set file type to Project Files, and navigate to the selected example directory.
- Open the selected project, for example:
- Thread:
<InstallFolder>/examples/thread/cli/ftd/uart/pca10056/blank/arm5_no_packs/thread_cli_uart_pca10056.uvprojx - Zigbee:
<InstallFolder>/examples/zigbee/light_control/light_bulb/pca10056/blank/arm5_no_packs/zigbee_light_bulb.uvprojx
- Thread:
- Build the example with Project->Build Target.
You can program the nRF52840 Development Kit directly from Keil µVision (Flash->Download), or use nrfjprog as described in Running an example without the SoftDevice (for standard examples) or Running an example with the SoftDevice (for Thread multiprotocol examples).
Building examples with SEGGER Embedded Studio
To build an example with SES, complete the following steps:
- Open SEGGER Embedded Studio.
- Select File->Open Solution and navigate to the selected example directory.
- Open the selected project, for example:
- Thread:
<InstallFolder>/examples/thread/cli/ftd/uart/pca10056/blank/ses/thread_cli_uart_pca10056.emProject - Zigbee:
<InstallFolder>/examples/zigbee/light_control/light_bulb/pca10056/blank/ses/zigbee_light_bulb.emProject
- Thread:
- Build the example with Build->Build Solution.
You can program the nRF52840 Development Kit directly from SEGGER Embedded Studio (Target->Download project name), or use nrfjprog as described in Running an example without the SoftDevice (for standard examples) or Running an example with the SoftDevice (for Thread multiprotocol examples).
Running examples
To program the nRF52840 Development Kit, first connect it to your computer with a USB cable. When your board is detected, you can download the example with the appropriate nrfjprog command, depending on the example.
Then, you can program the example either:
Running an example without the SoftDevice
To program the device, run:
To list the available nrfjprog commands, run:
Optionally, when using GCC, you can type the following commands:
Running an example with the SoftDevice
The SoftDevice is used by the multiprotocol examples (available only for Thread).
To write SoftDevice to the device, run:
To write an application to the device, run:
Optionally, when using GCC, you can type the following commands: