Table of Contents
Thread commissioning can be configured in one of the following ways:
Before you start the configuration process, make sure you are familiar with Thread commissioning concepts.
Configuring on-mesh Thread commissioning
You can configure on-mesh Thread commissioning in one of the following ways:
Configuring with the CLI example
In this scenario, you use Thread CLI Example with two devices to form a Thread network. One device will act as a Commissioner and the other will be a Joiner.
Requirements
- Two nRF52840 or nRF52833 Development Kits.
Flashing the boards
Flash both development kits with the Thread CLI Example – see the example's page for details.
After flashing, both devices are pre-commissioned to the same Thread network. This means that if channel and panid are set to the same value on both devices, they both become members of the same Thread network after entering the following commands:
To properly observe the commissioning process, it is recommended to form a new Thread network.
Forming a new network
To form a new Thread network, create a new dataset on one of the devices and set it as active by entering the following commands:
To view the newly generated network settings, enter the dataset command, for example:
Both devices have now different network settings, which means that it is impossible for either device to communicate with the other. This allows for adding a device to the network using on-mesh commissioning.
Performing on-mesh commissioning
First, start the newly configured Thread network:
- Run the following command: > ifconfig upDone> thread startDone
- After a couple of seconds, check the state: > stateLeaderDone
On-mesh commissioning can be now used to add the second CLI device to the newly formed Thread network. The device that formed the network will take the role of the Commissioner. The second device will be the Joiner.
To perform the on-mesh commissioning:
- Retrieve the
EUI64identifier from the Joiner:> eui64f4ce3687a6e4f6e8Done - Start the Commissioner: > commissioner startDone
- Give the Commissioner the EUI64 identifier of the Joiner and set up a pre-shared key (see Security, authentication, and credentials for encoding limitations): For example:> commissioner joiner add <eui64> <pre-shared base32-thread key>The Commissioner starts listening for the specified Joiner.> commissioner joiner add f4ce3687a6e4f6e8 N0RD1CDone
- Start the Joiner: For example:> ifconfig upDone> joiner start <pre-shared base32-thread key>DoneAfter a couple of seconds, the following message appears:> joiner start N0RD1CDoneThe Joiner starts broadcasting discovery requests on all available channels. When the Commissioner receives the discovery request, it responds to the sender. After the response, a DTLS session is established to securely authenticate the Joiner and exchange the network credentials.Join success
- After a successful joining process, attach the newly added device to the Thread network with the following command: Both devices are now able to ping each other.> thread startDone
Configuring with the wpantund
In this scenario, you use wpantund alongside Thread CLI Example and Thread NCP/RCP Example.
Requirements
- Two nRF52840 or nRF52833 Development Kits.
- PC running Linux with wpantund.
Flashing the boards
Before attempting to perform the commissioning process:
- Install and correctly configure
wpantundon the computer.- See the Usage Overview section on the wpantund GitHub page for more information about the correct configuration.
- Flash Thread CLI Example on one of the boards.
- Flash NCP example on the other board and connect it to the computer running the wpantund.
Forming a new network
- Note
- You don't need to perform below operations for the Nordic OpenThread Demo Border Router, where configuration is applied automatically.
When the wpantund is set up, form a new Thread network:
- Leave the Thread network you are currently connected to: $ sudo wpanctl leaveLeaving current WPAN. . .
- Set the network credentials: sudo wpanctl setprop Network:PANID 0xABCDsudo wpanctl setprop Network:XPANID 0xDEAD00BEEF00CAFEsudo wpanctl setprop Network:Key 11112233445566778899AABBCCDDEEFF
- Set the on-mesh prefix: sudo wpanctl config-gateway -d "fd11:22::"
- Generate a hex-encoded PSKc by using a Passphrase (Commissioner Credential), the Extended PAN ID, and the network name with the PSKc generator tool on the OpenThread Border Router: cd ~/ot-br-posix/tools./pskc 123456 0xDEAD00BEEF00CAFE NordicOpenThreadE00F739803E92CB42DAA7CCE1D2A394D
- Set the PSKc: sudo wpanctl setprop Network:PSKc --data E00F739803E92CB42DAA7CCE1D2A394D
- Form the Thread network. Make sure to use the same network name used to generate the PSKc: $ sudo wpanctl form "NordicOpenThread"Forming WPAN "NordicOpenThread" as node type "router"Successfully formed!
The wpantund forms a new network called "NordicOpenThread".
You can check the status of the network by entering the following command:
For example, for nRF52840:
Performing on-mesh commissioning
In this scenario, the wpantund controlling the NCP takes the role of the Commissioner. The CLI device is the Joiner.
To commission the device to the newly formed network:
- Retrieve the EUI64 identifier from the Joiner: > eui64 f4ce368b2bd9e911Done
- Start the Commissioner using the wpanctl utility: $ sudo wpanctl commissioner startCommissioner started
- Add the Joiner's EUI64 and set up the pre-shared key: For example:$ sudo wpanctl commissioner joiner-add <eui64> <timeout> <pre-shared key>$ sudo wpanctl commissioner joiner-add f4ce368b2bd9e911 100 N0RD1CAdded Joiner F4:CE:36:8B:2B:D9:E9:11, timeout:100, PSKd:"N0RD1C"
- Start the Joiner: After a couple of seconds, the following message appears:> joiner start N0RD1CDoneJoin success
- Attach the newly joined device to the Thread network: The CLI device and the NCP are now connected to a single Thread network.> thread start
Configuring external Thread Commissioning
This guide describes how to set up external Thread Commissioning with the use of the Thread App for Android. As the result, The Nordic CLI example device joins the Thread Network.
Requirements
- Make sure that the EXPLORE-NFC shield is not connected to the Raspberry Pi. Raspberry Pi must be powered off when you disconnect the shield.
- Prepare the Border Router as described in Setup procedure.
- Flash an nRF52840 or an nRF52833 Development Kit with the CLI example. You can use either the UART or the USB version. For example, for nRF52840, run the following command: nrfjprog --chiperase --family NRF52 --reset --program <InstallFolder>/examples/thread/cli/ftd/uart/hex/nrf52840_xxaa_pca10056.hex
- Once the Joiner device is ready, obtain its IEEE EUI-64. To do this, use the
eui64command in the OpenThread CLI:> eui64f4ce36d76bbd2876Done - Download and install the Thread Commissioning App that supports the external commissioning. It is available only for Android devices in the Google Play Store.
Configuring the device
Once the Thread Commissioning App is downloaded and installed:
- Start the Thread Commissioning App.
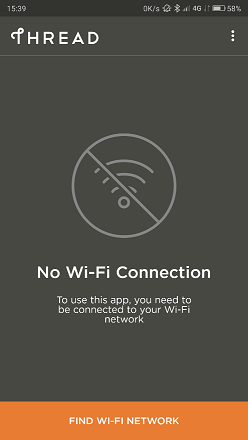 Start the app
- Tap FIND WI-FI NETWORK and connect the device running the Thread Commissioning App to the Wi-Fi access point.
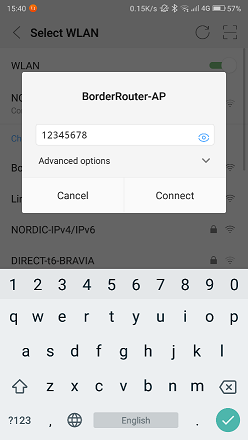 Connect to the Wi-Fi access point
- Note
- The smartphone running the Thread Commissioning App and the Thread Border Router must be connected to the same Local Area Network. In this example, the smartphone is connected to the Access Point on your Thread Border Router. However, you may as well connect the Border Router to your Local Network (either using Wi-Fi or Ethernet) together with your smartphone. In this case, the joining node will be able to connect to the Internet through the Border Router.
- Select the target Border Router from the available list. The name is the same as the Thread network created by the OTBR Web GUI. If the same Border Router shows up multiple times with different IPv4 and IPv6 addresses, select the one with the static IPv4 address used for the Wi-Fi access point setup (10.42.0.1 in this case).
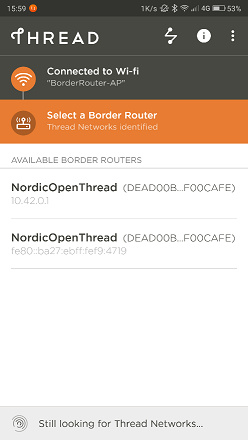 Select the Border Router to connect to
- When prompted for a password, enter the passphrase
123456(Commissioner Credential). The passphrase is automatically configured during the autostart procedure. The passphrase may differ if it has been changed in the Form Network section in the web panel.
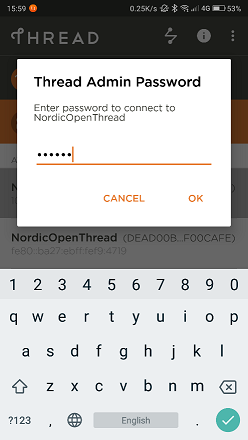 Enter the passphrase
- Commission the Joiner. Once connected to the Border Router, the app provides the option to scan a Connect QR Code or enter a Join Passphrase manually.
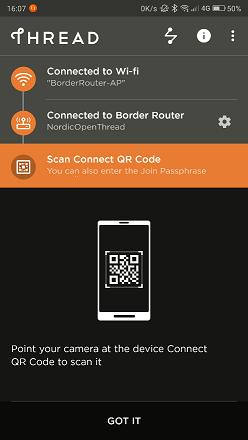 Commission the Joiner
- Optional: Generate a QR code.
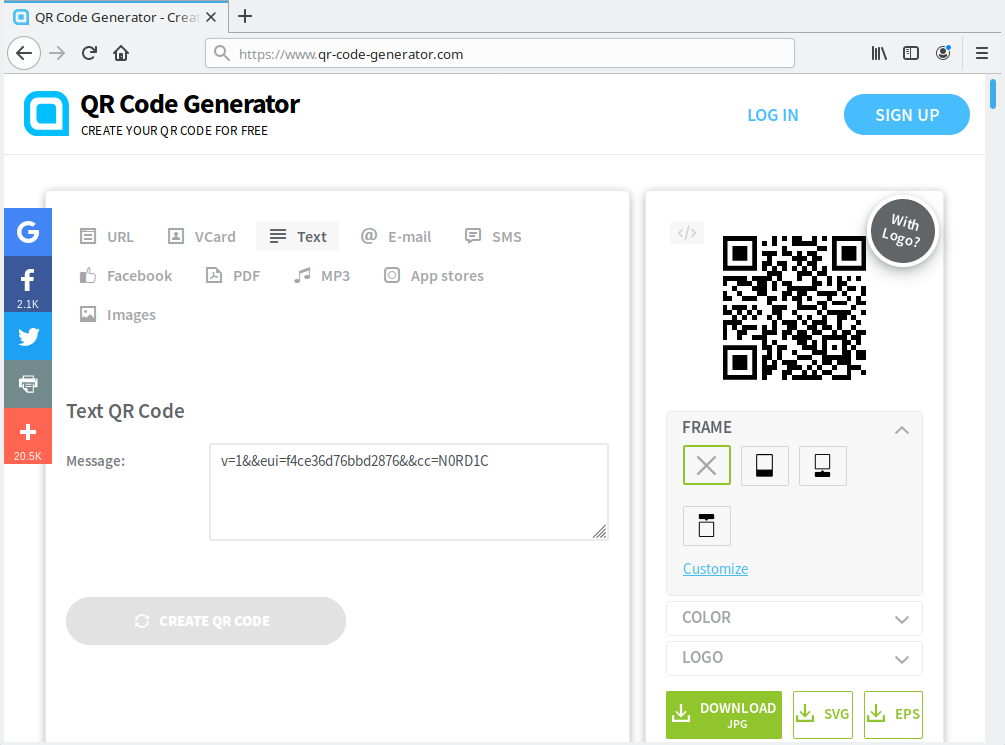 Generate a QR code
Thread Connect QR Codes are created with the following text string format:In this string,v=1&&eui=f4ce36d76bbd2876&&cc=N0RD1Ceuiis the Joiner device's EUI64 value and cc is the Joiner Credential. Use this text string with an online QR Code generator to create a QR Code for scanning.- Note
- The Joiner Credential is a device-specific string of all uppercase alphanumeric characters (0-9 and A-Y, excluding I, O, Q, and Z for readability), with a length between 6 and 32 characters.
- Scan the QR code or manually enter the EUI64 and Joiner Credential. Scanning the Connect QR Code or manually entering the credentials generates the PSKd, which propagates the steering data through the Thread network.
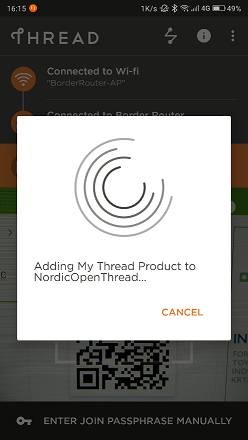 Adding the Joiner to the Thread Network
- Start the Joiner. While the app is waiting, enter the OpenThread CLI on the Joiner device and start the Joiner role with the same Joiner Credential: Wait a minute for the DTLS handshake to complete between the Commissioner and Joiner.> ifconfig upDone> joiner start N0RD1CDone>Join success!
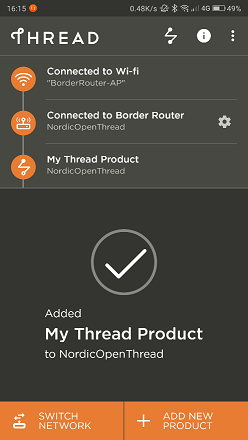 Joiner added to the Network
The Thread Commissioning App displays an "Added My Thread Product" confirmation message.
The Joiner has obtained the Thread network credentials and can now join the network.
Joining the network
To join the network on the Joiner device:
- Start the Thread protocol to automatically join the network. > thread startDone
- Check the state after a few moments to confirm. It may initially start as a child, but within two minutes, it upgrades to a router. > staterouterDone
- Check the IPv6 addresses of the device. If the Nordic Border Router is connected to the Internet, the Joiner will have the ability to connect with the outside world. In case there is an on-mesh IPv6 connection with prefix equal or shorter than /63 available for the Border Router, it will assign the /64 global pool for the Thread Network. In case of lack of a proper prefix, NAT64 can still be used with the local IPv4 connection. > ipaddrfdde:ad11:11de:0:0:ff:fe00:9400fd11:22:0:0:3a15:3211:2723:dbe1fe80:0:0:0:6006:41ca:c822:c337fdde:ad11:11de:0:ed8c:1681:24c4:3562
Testing the connectivity
You can test the connectivity between the Joiner device in the Thread network and the Internet by pinging a public IPv4 address.
To reach the IPv4 address from the Thread device, use a Well-Known Prefix of 64:ff9b::/96 and an IPv4 address of the destination.
Connectivity test example
To ping Google’s DNS 8.8.8.8 from the IPv6 address, append a hexadecimal form of the IPv6 to the Well-Known Prefix resulting in: 64:ff9b::808:808.
Ping this address from the device running the Nordic CLI example (the Joiner):
You can also use a mixed IPv6 prefix with an IPv4 suffix:
Portions of this page are reproduced from work created and shared by Google and used according to terms described in the Creative Commons 3.0 Attribution License.
Thread is a registered trademark of the Thread Group, Inc.