Table of Contents
These testing multiprotocol scenarios are based on the Benchmark Application Example.
In the standard testing scenario described in the Benchmark Application example, all devices are running only Thread or Zigbee protocol. Nordic Multiprotocol solution allows adding a simultaneous BLE operation, in which the device can act both as a Central or a Peripheral device. At any moment, you can use the ble commands to configure and enable Bluetooth Low Energy on the Thread or Zigbee node.
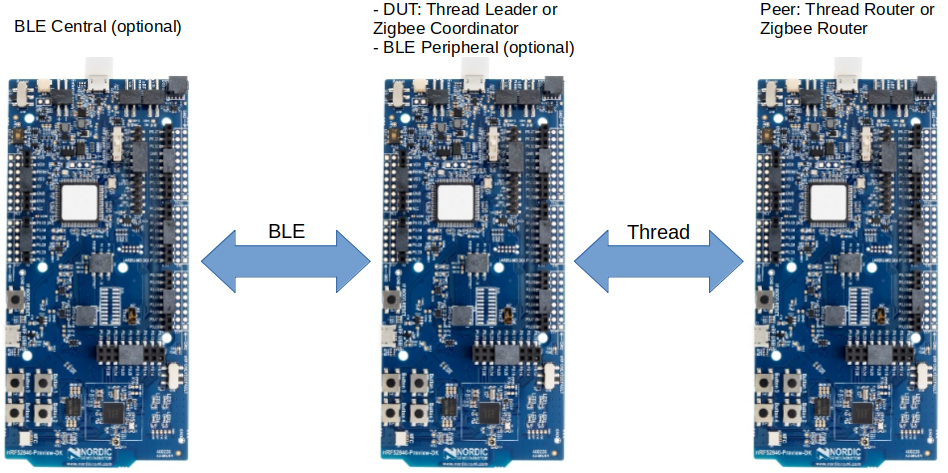
See the following image for the multiprotocol setup that is based on three devices:
- BLE Central – a pure BLE node with Thread or Zigbee disabled, or sending only control traffic.
- DUT – a multiprotocol node that acts as a full Thread or Zigbee device and BLE Central or Peripheral simultaneously.
- Peer – a pure Thread or Zigbee node with no BLE enabled.
All these nodes are running benchmark firmware.
Setup
You can find the source code and the makefile in the following folder:
<InstallFolder>/examples/multiprotocol/benchmark/{thread,zigbee}<InstallFolder>/components/softdevice/s140
Testing
You can test the following scenarios:
- BLE advertisement only
- BLE scanning only
- BLE connection (idle)
- BLE connection (sending data)
Each of these scenarios is a more advanced version of the previous one.
Testing scenario with BLE advertisement only
If the DUT multiprotocol node is meant just to send BLE advertisements, it is sufficient to use only the DUT and Peer nodes, and run ble adv start on the DUT. This command enables advertising with the default parameters. If you need to configure the advertisement parameters, complete the configuration before the advertising is started. Use commands described in Bluetooth advertising configuration.
To test multiprotocol scenarios for BLE advertisement only:
- Prepare two nRF52840 Development Kits.
- Flash the SoftDevice to all boards according to the instructions in Running examples.
- Program the example by using one of the following options:
- Default instructions:
- Build and flash the example according to the instructions in Building examples.
- Precompiled hex file:
- Run the following commands on all boards to flash the application: $ cd <InstallFolder>/examples/multiprotocol/benchmark/thread/hex$ nrfjprog -f NRF52 --sectorerase --program nrf52840_xxaa_s140_pca10056.hex
- Run the following commands on all boards to flash the application:
- Default instructions:
- Reset the boards.
- Start a terminal emulator like PuTTY and connect to the used COM port with the following UART settings:
- Baud rate: 115200
- 8 data bits
- 1 stop bit
- No parity
- HW flow control: RTS/CTS
- Start the DUT and Peer nodes by executing the following commands on the DUT node: ble adv infoble adv interval 200ble adv start
To stop the BLE advertisement, execute the following command on the DUT node:
Testing scenario with BLE scanning only
If the DUT multiprotocol node is meant just to perform continous BLE scanning, it is sufficient to use only the DUT and Peer nodes, and run ble scan start. This command enables scanning with the default parameters. If you need to configure the scanning parameters, complete the configuration before the scanning is started. Use commands described in Bluetooth scanning configuration.
To test multiprotocol scenarios for BLE scanning only:
- Prepare two nRF52840 Development Kits.
- Flash the SoftDevice to all boards according to the instructions in Running examples.
- Program the example by using one of the following options:
- Default instructions:
- Build and flash the example according to the instructions in Building examples.
- Precompiled hex file:
- Run the following commands on all boards to flash the application: $ cd <InstallFolder>/examples/multiprotocol/benchmark/thread/hex$ nrfjprog -f NRF52 --sectorerase --program nrf52840_xxaa_s140_pca10056.hex
- Run the following commands on all boards to flash the application:
- Default instructions:
- Reset the boards.
- Start a terminal emulator like PuTTY and connect to the used COM port with the following UART settings:
- Baud rate: 115200
- 8 data bits
- 1 stop bit
- No parity
- HW flow control: RTS/CTS
- Start the DUT and Peer nodes by executing the following commands on the DUT node: ble scan infoble scan interval 200ble scan start
To stop the BLE scanning and see discovered peripherals, execute the following command on the DUT node:
Testing scenario with BLE connection (idle)
In case you want to test the BLE connection, use the DUT, Peer, and BLE Central nodes to simulate a more realistic scenario. Similiarly to the advertising mode, the connection parameters are described in the Bluetooth connection configuration.
To test multiprotocol scenarios for BLE advertising and BLE connection:
- Prepare three nRF52840 Development Kits.
- Complete the steps above from the Testing scenario with BLE advertisement only.
- After running the
ble adv startcommand, execute also the following commands on the DUT node:You will seetest peer discovertest infotest configure mode unidirectionaltest configure count 2000test configure length 79test start=== Test Finished ===results similar to the standard Benchmark Application Example results. The basic configuration with BLE advertising is done and started. - Start the third board.
- Establish a BLE connection between the BLE Central device and the DUT device.
- On the DUT node, execute the following commands: ble conn info
- Read the Bluetooth Device Address (
bdaddr) reported by the DUT node. - Execute the following commands on the BLE Central: The following results appear:ble conn start [bdaddr]ble conn infoBluetooth connection configuration:Scan interval: 100 msScan window: 50 msSlave latency: 0Bluetooth Device Address: [BLE Central bdaddr]Connected devices: 1Bluetooth connected device 0:Connection interval: 100Bluetooth Device Address: [DUT bdaddr]Done
- On the DUT node, execute the following commands:
The devices are now in a Bluetooth connection. However, they are in the idle state, and not sending data.
Testing scenario with BLE connection (sending data)
To test multiprotocol scenarios for BLE advertising and BLE connection, with the devices sending data:
- Complete the steps from the Testing scenario with BLE connection (idle) section.
- Execute the following command on the DUT node: You will seetest start
=== Test Finished ===results similar to the standard Benchmark Application Example results. - Pay attention to the unidirectional throughput value.
- Execute the following command on the BLE peripheral to set the flood packet size to 90 bytes of data and enable flood autostart: ble flood length 90ble flood autostart enable
- Start the test again on the DUT device: The BLE connection is now senting data.test start
- Pay attention to the unidirectional throughput value. It decreased as the result of the BLE transfer.
To stop the Bluetooth traffic:
- Execute the following command on the BLE peripheral node to stop sending data and end the connection with the DUT node: ble conn stop [DUT bdaddr]
- Execute the following command on the DUT node to stop advertising: ble adv stop