This page provides an overview of the provisioning procedure and the available API functions for setting up a provisioner and setting up a provisionee.
For more information about provisioning, see Provisioning.
Table of contents
- Using provisioner APIs on the provisioner
- Using provisioning APIs on the provisionee (unprovisioned device)
- Handing errors
The following diagram illustrates the provisioning procedure, with all function calls, messages, and events.
- Note
- Before using the provisioning stack, the SoftDevice and Bluetooth mesh stack must be initialized and enabled. As a reference, see
mesh_init()in themain.cfile of thelight-switch\serverexample or any other example exhibiting the Node role.
You can exclude code for one of the roles if your device is not using it. To do so, link only the code for the role that you want the device to support. Calling an unsupported function whose role functionality has not been compiled into the library will return NRF_ERROR_NOT_SUPPORTED.
Using provisioner APIs on the provisioner
Provisioners are Bluetooth mesh nodes that are responsible for the configuration of other nodes in the network. Typically, provisioners contain a configuration client and client nodes for controlling specific functionality in other nodes, such as lights or air conditioners. Provisioners are often a part of gateway devices, which are devices that provide a bridge between a Bluetooth mesh network and other networking technologies (such as the Internet).
There are two main ways of setting up a provisioner:
- running it as a standalone application (standalone provisioners),
- having it controlled by a host application through a serial interface (serial provisioners).
The following figure illustrates the provisioner flow for both setups.
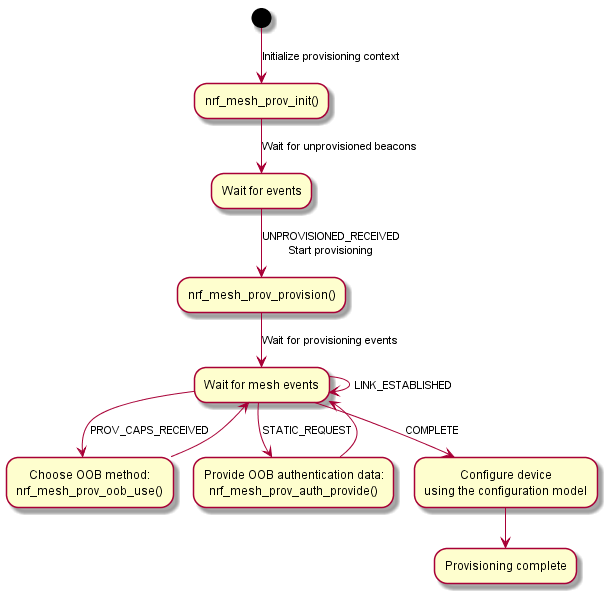
Setting up standalone provisioner
The standalone provisioner provides provisioning functionality without depending on an external host. As such, a standalone provisioner must be able to store information about the provisioned nodes in the network, including their addresses and device keys, which is necessary for the provisioner to be able to configure the nodes.
Because of the limited amount of memory available in embedded processors, using a standalone provisioner limits the amount of nodes that can be provisioned. This limit corresponds to the maximum size of the Bluetooth mesh network.
To provision a device using the standalone provisioner, make sure you implement the following steps in your provisioner application:
- Step 1: Initialize a standalone provisioner
- Step 2: Start the provisioning procedure
- Step 3: Receive Provisioning Capabilities and select public key exchange and authentication method
- Step 4: Exchange public keys
- Step 5: Authenticate the provisioning procedure
- Step 6: Complete the provisioning procedure
Step 1: Initialize a standalone provisioner
To use any provisioning API, a provisioning context must be initialized using the nrf_mesh_prov_init() function.
The function needs statically allocated provisioning context structure with related parameters.
The provisioning context structure maintains the state of the provisioning process. Among other information, it contains the following data that is initialized based on the parameter values provided by the user:
- Pointers to public and private keys – a key pair used for encryption. These keys can be preprogrammed or generated using the
nrf_mesh_prov_generate_keys()function.- Note
- These numbers must be points on a specific elliptic curve, which means that regular random numbers cannot be used as a key pair.
See prov_helper_provisioner_init() in the static provisioner example (/examples/light-switch/provisioner/src/provisioner_helper.c) to see how to initialize a provisioner.
Step 2: Starting the provisioning procedure
The provisioning procedure is started by calling nrf_mesh_prov_provision() API.
Make sure the following parameters are provided to this API:
- Pointer to the provisioning context.
- Pointer to the UUID of the node to be provisioned.
- Attention timer interval (in seconds).
- Pointer to the provisioning data.
- This data contains information about netkey, netkey index, IV index, target address, IV update flag, and Key Refresh Flag to be provided to the unprovisioned device.
- Bearer to use.
- Currently, the Bluetooth mesh stack supports only Provisioning over Advertising Bearer (PB-ADV) in provisioner role.
As a result, the provisioning modules:
- Open the provisioning link with the device indicated by the UUID.
- Send a Provisioning Invite message to invite the unprovisioned device to participate in the provisioning process.
Step 3: Receiving Provisioning Capabilities and selecting public key exchange and authentication method
The unprovisioned device responds to the Provisioning Invite message by sending a Provisioning Capabilities message. This action generates the NRF_MESH_PROV_EVT_CAPS_RECEIVED event for the provisioner application.
The provisioner application then checks the capabilities of the unprovisioned device reported in the event parameters. It then calls the nrf_mesh_prov_oob_use() function to select the public key exchange mechanism and the authentication method.
After NRF_MESH_PROV_EVT_CAPS_RECEIVED event is generated, make sure you call the nrf_mesh_prov_oob_use() function with the variables and parameters that are used:
- Public key exchange mechanism.
- If a public key of the unprovisioned device is available Out-of-Band (OOB), the provisioner application must set
capabilities.pubkey_typeto NRF_MESH_PROV_OOB_PUBKEY_TYPE_OOB in the provisioning context. Otherwise, the application should not set this value.
- If a public key of the unprovisioned device is available Out-of-Band (OOB), the provisioner application must set
- OOB authentication method.
- Set the
methodparameter to one of the following:- For static OOB authentication: NRF_MESH_PROV_OOB_METHOD_STATIC.
- For output OOB authentication: NRF_MESH_PROV_OOB_METHOD_OUTPUT.
- For input OOB authentication: NRF_MESH_PROV_OOB_METHOD_INPUT.
- For no authentication: NRF_MESH_PROV_OOB_METHOD_NONE.
- Set the
actionparameter to one of the values mentioned in thenrf_mesh_prov_types.hfile. - Set the
sizeparameter to a value between0x01and0x08(as defined in Bluetooth mesh profile specification).
- Set the
Step 4: Exchanging public keys
Exchanging public keys depends on whether you set capabilities.pubkey_type in Step 3:
- If
capabilities.pubkey_typeis set to NRF_MESH_PROV_OOB_PUBKEY_TYPE_OOB in response to NRF_MESH_PROV_EVT_CAPS_RECEIVED event, the provisioning process will raise NRF_MESH_PROV_EVT_OOB_PUBKEY_REQUEST event for the provisioner application.- After receiving this event, provisioner application should fetch the Public Key of the provisionee (for example, ask user to type it in console if UART interface is available) and provide it to the stack using nrf_mesh_prov_pubkey_provide() API.
- If
capabilities.pubkey_typeis not set, the public key will be exchanged In-Band and no event will be generated.
Step 5: Authenticating the provisioning procedure
Depending on the authentication method choice in Step 3, the stack will generate different events:
- For static OOB (NRF_MESH_PROV_OOB_METHOD_STATIC): the Bluetooth mesh stack will generate the NRF_MESH_PROV_EVT_STATIC_REQUEST event.
- After this event is received, the provisioner application should provide the static OOB value by calling nrf_mesh_prov_auth_data_provide() API to continue the process.
- For output OOB (NRF_MESH_PROV_OOB_METHOD_OUTPUT): the Bluetooth mesh stack will generate NRF_MESH_PROV_EVT_INPUT_REQUEST.
- After this event is received, the provisioner application should request the input data from user and provide it by calling nrf_mesh_prov_auth_data_provide() API to continue the process.
- For input OOB (NRF_MESH_PROV_OOB_METHOD_INPUT): the Bluetooth mesh stack will generate NRF_MESH_PROV_EVT_OUTPUT_REQUEST and provide data as output to the application.
- After this event is received, the application should use the provided data to carry out the output action.
- For no authentication (NRF_MESH_PROV_OOB_METHOD_NONE): no events will be generated during the provisioning process.
Step 6: Completing the provisioning procedure
If the authentication succeeds:
- The stack will distribute the provisioning data to the unprovisioned device.
- The unprovisioned device will then send a Provisioning Complete message to indicate that it has received the data.
- After receiving this message, the Bluetooth mesh stack will generate NRF_MESH_PROV_EVT_COMPLETE event. The provisioner application can then store the device key and address of the newly provisioned device.
After this step, the provisioning link will be closed and the NRF_MESH_PROV_EVT_LINK_CLOSED event will be generated.
Setting up serial provisioner
Serial provisioners use the serial interface to do provisioning, allowing a host controller to interact with the Bluetooth mesh network using an external microcontroller.
The host controller stores information about the nodes on the network, which saves RAM in the external microcontroller for other application-specific uses. The size of the Bluetooth mesh network is limited only by the resources available in the host machine.
The steps to include in your serial provisioner application are the following:
- Initialize the SoftDevice and the Bluetooth mesh stack using the standard procedure.
- Initialize and enable the serial interface using
nrf_mesh_serial_init()andnrf_mesh_serial_enable()API functions. - Enable the ECDH offloading.
- Provision a device with the same procedure as for standalone provisioners, but replace the standalone API calls with serial commands and the standalone events with serial events.
ECDH offloading
The ECDH (Elliptic Curve Diffie-Hellman) is a crytographic algorithm used to securely create a shared secret between two devices. It is used to create an encryption key, which is then used for securing the provisioning data as it is being transferred to the provisionee.
Enable the ECDH offloading if you are running multiple provisioners in parallel. The ECDH is a processor-intensive algorithm that can easily become a bottleneck. The ECDH offloading is a feature that lets the host processor calculate the ECDH shared secret, which saves CPU resources in the target processor.
To enable the ECDH offloading, make sure your application calls mesh_opt_prov_ecdh_offloading_set when initializing the device.
Using provisioning APIs on the provisionee (unprovisioned device)
Provisionee is a device that will be provisioned by the provisioner. After provisioning completes successfully, this device becomes a node in the Bluetooth mesh network.
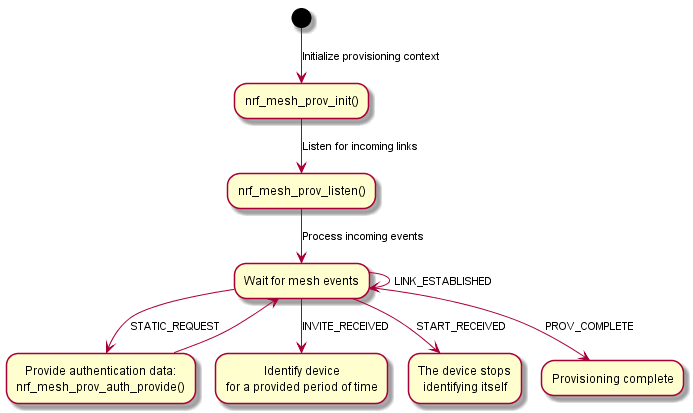
The following figure shows a sample flow chart of the provisioning process when the Static OOB authentication is used.
To provision an unprovisioned device, make sure you implement the following steps in your provisionee application:
- Step 1: Initializing a provisionee
- Step 2: Starting the provisioning procedure
- Step 3: Sending Provisioning Capabilities and receiving Provisioning Start
- Step 4: Exchanging public keys
- Step 5: Authenticating the provisioning procedure
- Step 6: Completing the provisioning procedure
Step 1: Initializing a provisionee
To use any provisioning API, a provisioning context must be initialized using the nrf_mesh_prov_init() function.
The function needs statically-allocated provisioning context structure and other related parameters.
The provisioning context structure maintains the state of the provisioning process. Among other information, it contains the following data that is initialized based on the parameter values provided by the user:
- Pointers to public and private keys – a key pair used for encryption. These keys can be preprogrammed or generated using the
nrf_mesh_prov_generate_keys()function.- Note
- These numbers must be points on a specific elliptic curve, which means that regular random numbers cannot be used as a key pair.
- Out-of-band (OOB) authentication capabilities – used to determine what kind of authentication can be used with the node.
- The authentication method is selected by setting one or more values of the authentication-related fields (
oob_static_type,oob_output_size,oob_output_actions,oob_input_size, andoob_input_actions):- For authentication using Static OOB: set oob_static_types to NRF_MESH_PROV_OOB_STATIC_TYPE_SUPPORTED.
- When this authentication method is supported, the provisionee application should provide Static OOB information when requested by the provisioner.
- If Output OOB is not used, set the
oob_static_typesto0.
- For authentication using Output OOB: set oob_output_size to a value between
0x01to0x08and oob_output_actions to a desired output action.- When this authentication method is supported, the provisionee application should carry out oob_output_actions as specified by the provisioner.
- If Output OOB is not used, set the
oob_output_sizeto0x00.
- For authentication using Input OOB: set oob_input_size to a value between
0x01to0x08and oob_input_actions to a desired output action.- When this authentication method is supported, the provisionee application should be ready to get the input OOB data from the user as requested by the provisioner.
- If Input OOB is not used, set the
oob_input_sizeto0x00.
- For no authentication: set only the algorithms field.
- For authentication using Static OOB: set oob_static_types to NRF_MESH_PROV_OOB_STATIC_TYPE_SUPPORTED.
- The authentication method is selected by setting one or more values of the authentication-related fields (
For regular Bluetooth mesh devices (the devices exhibiting the node role), the initialization of the provisioning stack with bearers is encapsulated by the Mesh stack within the mesh_provisionee_prov_start() API.
The authentication options can be customized in mesh_provisionee_prov_start() by updating the prov_caps structure with desired values.
Step 2: Starting the provisioning procedure
The provisioning procedure is started by the provisioner, which opens a provisioning link and sends a provisioning invite.
Before the provisioning link can be opened, the unprovisioned device must initialize the provisioning APIs and bearers and it must be ready to receive the request to open the link. For Bluetooth mesh example applications, this process is encapsulated in the mesh_provisionee_prov_start() API in the mesh_provisionee.c module and includes the following actions:
- Select the default values for public key exchange (In-Band).
- Select the authentication options (Static OOB).
- Call the nrf_mesh_prov_init() API.
- Initialize bearers.
- Start advertising the unprovisioned node beacons by calling nrf_mesh_prov_listen() API. The advertisement can optionally include both of the following elements:
- a URI that points to the location for additional data,
- a field that specifies the location where the OOB information can be found.
To customize public key exchange and authentication options, you can modify the prov_caps structure values in this API.
- Note
- Modifying
prov_capsoptions here will change these options for all examples. Alternatively, you can copy this module with some other name, update theprov_capsvalues, and use this new module in your project.
Once the provisioner opens the link, the Bluetooth mesh stack generates NRF_MESH_PROV_EVT_LINK_ESTABLISHED event. When the Provisioning Invite message is received, the Bluetooth mesh stack generates the NRF_MESH_PROV_EVT_INVITE_RECEIVED event and provides the attention timer duration value as the event parameter. This event is handled by the mesh_provisionee.c module and the user application callback is called to allow the application to attract attention of the end-user. For example, this can mean blinking LEDs for a given duration.
Step 3: Sending Provisioning Capabilities and receiving Provisioning Start
The unprovisioned device will respond to the Provisioning Invite message by sending a Provisioning Capabilities message (with settings specified in Step 1. This will not generate any event for the provisionee application.
The provisioner picks up the public key exchange and the authentication method from the provided capabilities and sends the Provisioning Start message. This generates the NRF_MESH_PROV_EVT_START_RECEIVED event on the provisionee side.
Step 4: Exchanging public keys
Exchanging public keys depends on whether the provisionee sets capabilities.pubkey_type to NRF_MESH_PROV_OOB_PUBKEY_TYPE_OOB :
- If the the provisionee sets
capabilities.pubkey_typeto NRF_MESH_PROV_OOB_PUBKEY_TYPE_OOB, the provisioner:- Reads the public key of the provisionee Out-of-Band (for example, from a text file, if the provisioner is a tablet or a computer).
- Sends its own public key.
- If the the provisionee does not set
capabilities.pubkey_typeto NRF_MESH_PROV_OOB_PUBKEY_TYPE_OOB :- The provisionee stack will send its public key In-Band.
After this step, the authentication will be performed.
Step 5: Authenticating the provisioning procedure
Depending on the available capabilities and the authentication method chosen by the provisioner, the Bluetooth mesh stack will generate different events:
- For static OOB authentication (NRF_MESH_PROV_OOB_METHOD_STATIC): the Bluetooth mesh stack will generate the NRF_MESH_PROV_EVT_STATIC_REQUEST event.
- After this event is received, the application should provide the static OOB value by calling nrf_mesh_prov_auth_data_provide() API to continue the process.
- Note
- The static OOB value is always 16-byte long.
- For output OOB authentication (NRF_MESH_PROV_OOB_METHOD_OUTPUT): the Bluetooth mesh stack will generate the NRF_MESH_PROV_EVT_OUTPUT_REQUEST and provide data output to the application as the event parameter.
- The application should then use this output data to carry out the output action.
- For input OOB authentication (NRF_MESH_PROV_OOB_METHOD_INPUT): the Bluetooth mesh stack will generate the NRF_MESH_PROV_EVT_INPUT_REQUEST event.
- The provisioner application should then request the input data from the user and provide it by calling nrf_mesh_prov_auth_data_provide() API to continue the process.
- For no authentication method (NRF_MESH_PROV_OOB_METHOD_NONE): no events will be generated during the authentication step.
Step 6: Completing the provisioning procedure
If the authentication succeeds:
- The stack receives the provisioning data from the provisioner.
- The Bluetooth mesh stack generates the NRF_MESH_PROV_EVT_COMPLETE event.
- The Bluetooth mesh stack sends the Provisioning Complete message to indicate that it has received the provisioning data.
- If PERSISTENT_STORAGE is enabled, upon receiving the NRF_MESH_PROV_EVT_COMPLETE event, the
mesh_provisioneemodule saves the provisioning data to the flash.
After this step, the provisioning link will be closed and the NRF_MESH_PROV_EVT_LINK_CLOSED event will be generated.
At this point, the device can receive more configuration details from the provisioner through the configuration model. The configuration happens automatically in the background as long as the configuration model server has been initialized (see the Light switch example for an example of how to do this).
Handing errors
If an error occurs in the provisioning procedure, the provisioning link is closed. An NRF_MESH_PROV_EVT_LINK_CLOSED event is passed to the application. This event contains the nrf_mesh_prov_evt_link_closed_t.close_reason parameter that can be used to determine what caused the provisioning to fail.
If an NRF_MESH_PROV_EVT_LINK_CLOSED event is received before an NRF_MESH_PROV_EVT_COMPLETE event, the provisioning procedure must be considered to have failed.
Additionally, the peer device may send a Provisioning Failed PDU as a result of any error other than the timeout. After receiving the Provisioning Failed PDU, the NRF_MESH_PROV_EVT_FAILED event is passed to the application. This event contains the failure_code parameter that can be used to determine what caused the Provisioning Failed event.