Important: Before you run this example, make sure to program the SoftDevice.
This dynamic multiprotocol example application is based on the UART/Serial Port Emulation over BLE example available in nRF5 SDK v15.2.0. It has been extended to support dynamic switching between two protocols, BLE and Zigbee, at the same time (concurrently). From the Zigbee protocol perspective, this example implements dimmable light switch, as described in the Light switch example.
To support both protocols at the same time, the Zigbee stack uses the 802.15.4 radio during the Bluetooth low energy radio's inactive time (using Timeslot API). Depending on the Bluetooth low energy connection interval, the nRF52840 SoC can spend up to 99% of the radio time on the Zigbee protocol. This is the same mechanism as the one used inside Thread Dynamic multiprotocol examples. For more information on multiprotocol operation, refer to the Multiprotocol support support section.
- Note
- Transmitting and receiving data does not break connections from any of the used radio protocols (BLE or Zigbee).
This BLE-Zigbee multiprotocol example requires running two other examples containing Zigbee coordinator and Zigbee light bulb. You can find these examples in Zigbee Light Control example.
LED assignments:
- BSP_LED_0: Shows BLE connection state:
- Blinking – BLE advertising.
- Continuously on – Connected over BLE.
- BSP_LED_2 – Is on when the device has successfully joined the Zigbee network.
- BSP_LED_3 – Is on when the device has successfully found a light bulb to control.
Button assignments:
Pressing BSP_BUTTON_1 after successful commissioning (BSP_LED_3 state) turns off the Zigbee light bulb. Pressing BSP_BUTTON_0 turns it back on. Using a long press adjusts the brightness level of the light bulb. BSP_BUTTON_1 decreases the brightness and BSP_BUTTON_0 increases the brightness. Hold the BSP_BUTTON_2 pressed while resetting the board to enable the Sleepy End Device behaviour.
- Note
- If the user decreases the brightness level to the minimum, the effect of turning on the light bulb might not be noticeable.
BLE UART command assignments:
- "n" - turns on Zigbee light bulb
- "f" - turns off Zigbee light bulb
- "t" - toggles Zigbee light bulb
- "i" - increases brightness level of Zigbee light bulb
- "d" - decreases brightness level of Zigbee light bulb
- numeric value (x) between 0 and 999 - toggles Zigbee light bulb after x seconds
Setup
You can find the source code in the following folder: <InstallFolder>\examples\multiprotocol\ble_zigbee\ble_zigbee_dynamic_light_switch_nus
Testing
- Precondition
- To test this example, prepare three nRF52840 Preview Development Kits and a smartphone (Android or iOS).
- On the smartphone, install nRF Toolbox for BLE.
- Run the following commands to flash the Zigbee coordinator example to one of the boards: $ cd <InstallFolder>/examples/zigbee/light_control/light_coordinator/hex$ nrfjprog -f nrf52 -r --program nrf52840_xxaa.hex --chiperase
- Run the following commands to flash the Zigbee dimmable light bulb example to another board: $ cd <InstallFolder>/examples/zigbee/light_control/light_bulb/hex$ nrfjprog -f nrf52 -r --program nrf52840_xxaa.hex --chiperase
- Build the example according to the instructions in Building examples.
- Flash SoftDevice and the example according to the instructions in Running examples.
- Start all boards as described in Zigbee Light Control example and wait until BSP_LED_3 on the multiprotocol node turns on.
- You can toggle BSP_LED_3 on the light bulb board in the network by pressing BSP_BUTTON_0 and BSP_BUTTON_1 on the light switch board.
- Open nRF Toolbox and choose the UART application.
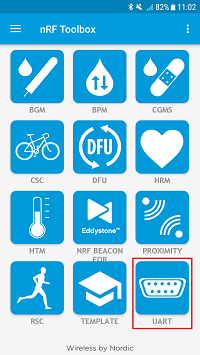 nRF Toolbox - UART application
 - Tap EDIT and configure five application buttons.
- Enter command "n" (EOL = LF)
- Enter command "f" (EOL = LF)
- Enter command "t" (EOL = LF)
- Enter command "i" (EOL = LF)
- Enter command "d" (EOL = LF)
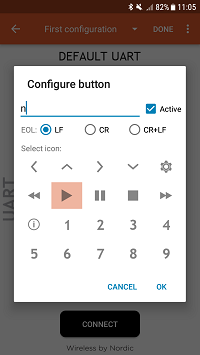 nRF Toolbox - UART application - Configure button
- After all buttons are configured, tap DONE.
- Tap CONNECT and select the Zigbee_UART device.
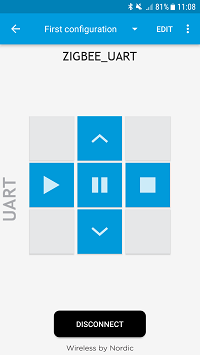 nRF Toolbox - UART application after establishing the connection
 - Observe that BSP_LED_0 on the multiprotocol light switch board is turned on, which indicates that a BLE connection has been established.
- You can control BSP_LED_3 on the Zigbee light bulb node by pressing the left ("n" - command), middle ("t" - command) and right ("f" - command) button from your smartphone.
- You can also adjust the brightness level by pressing the top ("i" - command) and bottom ("d" - command) button from your smartphone.
- If you want to test the delayed toggle command, you may add another button with the numeric command or create a separate configuration (screen).
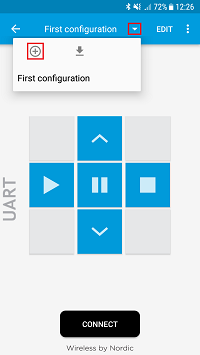 nRF Toolbox - Add configuration
 - For example, you may add buttons to toggle the light bulb after 1 ("1" - command), 3 ("3" - command), and 9 ("9" - command) seconds.
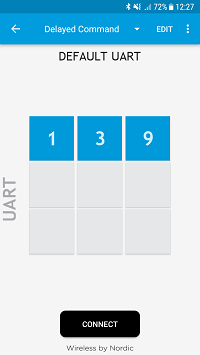 nRF Toolbox - Delayed toggle commands