Table of Contents
nRF5 SDK for Zigbee is intended for use with the nRF52840 Development Kit.
The SDK provides precompiled ZBOSS libraries for GCC, IAR and Keil 5. The GCC library was built on Linux with arm-none-eabi-gcc version 6.3.1. The IAR libraries were built with IAR Workbench 7.80.4. The Keil 5 libraries were built with Keil µVision V5.18a.
Every Zigbee example can be built with various toolchains and IDEs. Currently, the following build methods are provided:
- GCC Makefile
- IAR Embedded Workbench project
- Keil µVision 5 project
- SEGGER Embedded Studio project (3.40)
Environment setup
You must install a set of tools to complete the environment setup process.
Linux
Make
Make sure that you have the make tool installed on your system. To do this, run the following command:
If the command does not provide output, you must install the make tool. Refer to the documentation of your Linux distribution for information on how to download and install it.
GNU ARM Embedded Toolchain
To be able to compile projects for the nRF52840 Development Kit, you must install the GNU ARM Embedded Toolchain in version 6.3.1. You can download this version from GNU ARM Embedded Toolchain. Make sure to install it in the /usr/local/gcc-arm-none-eabi-6-2017-q2-update folder.
If you already have another version of arm-none-eabi installed, you can modify the default path in the following file: <InstallFolder>/components/toolchain/gcc/Makefile.posix.
SEGGER J-Link
To enable communication between devices, you need the SEGGER J-Link utility. You can download the latest version from the J-Link Download page.
- Note
- Due to a known issue in Segger’s J-Link firmware, depending on your operating system and version, you might experience data corruption or drops if you use the serial port. You can avoid this issue by disabling the Mass Storage Device:
- On Linux open JLinkExe from the terminal. On Microsoft Windows, open the J-Link Commander application.
- Run the following command: MSDDisable
nrfjprog
You need the nrfjprog tool to program the nRF52840 chips. The latest version of this tool can be found on the nRF52840 product website.
Windows
Make
The make tool, required to build GCC projects, is not natively available on Windows. However, the MinGW package can be used to install it:
- Download the MinGW installer. The 32-bit version is recommended.
- Run the downloaded binary and select the folder where the MinGW toolchain is to be installed. The recommended path is
C:\MinGW. When the first part of the installation is finished, the MinGW Installation Manager opens.
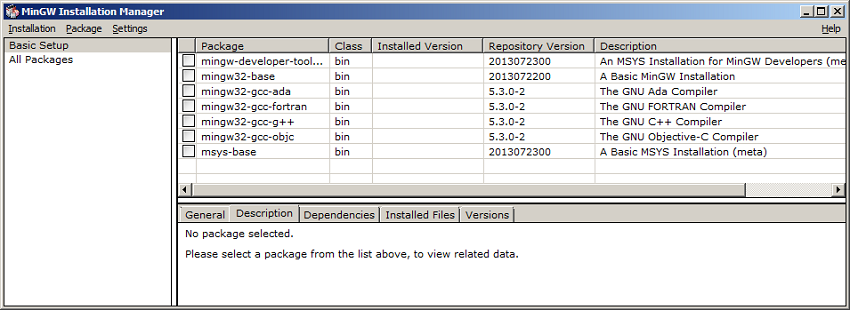 MinGW Installation Manager
- From the package list, select mingw32-base and msys-base.
- Click Installation -> Apply changes to install the selected items.
- Add the following paths to the PATH variable in your system:
C:\MinGW\binC:\MinGW\msys\1.0\bin
To modify the PATH variable:- Right-click My computer.
- Select Properties -> Advanced system settings -> Environment Variables and double-click the PATH variable.
- Append the existing string with the two paths, each preceded by a semicolon, for example: System reboot might be required for the new paths to work properly.…; C:\MinGW\bin;C:\MinGW\msys\1.0\bin
- After the installation process finishes, open the command prompt and verify that it succeeded. To do this, check that the Msys environment was set up correctly by running the following command: You will receive the following result:uname -–operating-system
 System information
 - Additionally, check that the
maketool was installed correctly by typingmake --versionand pressing Enter. If there are no errors during installation, the following message is displayed: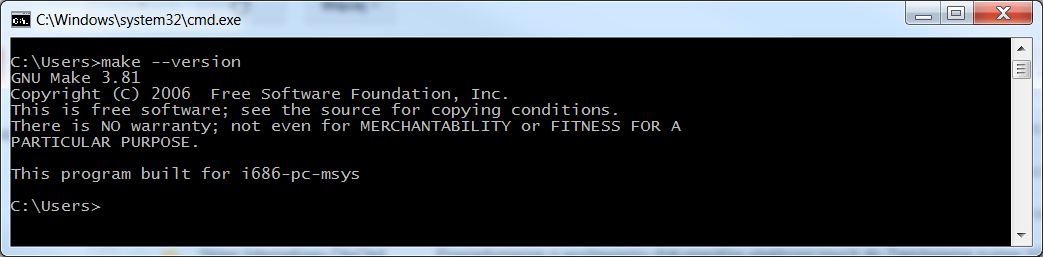 Version information
GNU ARM Embedded Toolchain
To be able to compile projects for the nRF52840 Development Kit, you must install GNU ARM Embedded Toolchain version 6.3.1. You can download this version from GNU ARM Embedded Toolchain. It is recommended to install it in the default directory: C:\Program Files (x86)\GNU Tools ARM Embedded\6 2017-q2-update.
If you already have another version of arm-none-eabi installed, or have installed it in a different directory, you can modify the default path in the following file: <InstallFolder>\components\toolchain\gcc\Makefile.windows.
nRF5x Command Line Tools
To communicate with and program the nRF52840 Development Kit, you need the SEGGER J-Link and nrfjprog tools. Download and install the latest version of nRF5x Command Line Tools from the nRF52840 product website. This package includes the latest version of SEGGER J-Link and nrfjprog utilities.
For Windows environment, add nrfjprog installation directory (for example C:\Program Files (x86)\Nordic Semiconductor\nrf5x\bin\) to your system PATH variable after the installation is complete.
- Note
- Due to a known issue in SEGGER’s J-Link firmware, depending on your operating system and version, you might experience data corruption or drops if you use the serial port. You can avoid this issue by disabling the Mass Storage Device:
- On Linux open JLinkExe from the terminal. On Microsoft Windows, open the J-Link Commander application.
- Run the following command: MSDDisable
- If you experience communication issues with the nRF52840 Development Kit, it is recommended to use the latest version of SEGGER J-Link. The installer can be found on the J-Link Download page.
Building examples
Building an example with GCC
To build an example with GCC, perform the following steps:
- Open Windows command line or Linux terminal.
- Navigate to the selected example folder, and then to the armgcc project directory, for example:
<InstallFolder>/examples/zigbee/light_control/light_bulb/pca10056/blank/armgcc. - Run the
makecommand in this folder. If the environment was set up correctly, the build process will start. - The build process produces the hex file inside the
_buildfolder:<InstallFolder>/examples/zigbee/light_control/light_bulb/pca10056/blank/armgcc/_build/nrf52840_xxaa.hex.- Note
- If you experience difficulties when running the
makecommand on Windows, make sure that you do not have any othermakeinstances from other toolsets like Cygwin or GnuWin32 in your PATH variable.
Building an example with IAR
To build and example with IAR, perform the following steps:
- Open IAR Embedded Workbench.
- Select File->Open->Workspace... and navigate to the selected example folder. Open the selected workspace, for example
<InstallFolder>/examples/zigbee/light_control/light_bulb/zigbee_light_bulb.eww - Build the example with Project->Make.
- You can program the nRF52840 Development Kit directly from IAR Embedded Workspace (Project->Download And Debug), or use nrfjprog as described below.
Building an example with Keil 5
To build an example with Keil µVision 5, perform the following steps:
- Open Keil µVision 5.
- Select File->Open, set file type to Project Files, and navigate to the selected example folder.
- Open the selected project, for example:
<InstallFolder>/examples/zigbee/light_control/light_bulb/pca10056/blank/arm5_no_packs/zigbee_light_bulb.uvprojx - Build the example with Project->Build Target.
You can program the nRF52840 Development Kit directly from Keil µVision (Flash->Download), or use nrfjprog as described in Running an example without the SoftDevice (for standard examples) or Running an example with the SoftDevice (for multiprotocol examples).
Building an example with SEGGER Embedded Studio
To build an example with SES, perform the following steps:
- Open SEGGER Embedded Studio.
- Select File->Open Solution and navigate to the selected example folder.
- Open the selected project, for example:
<InstallFolder>/examples/zigbee/light_control/light_bulb/pca10056/blank/ses/zigbee_light_bulb.emProject. - Build the example with Build->Build Solution.
You can program the nRF52840 Development Kit directly from SEGGER Embedded Studio (Target->Download project name), or use nrfjprog as described in Running an example without the SoftDevice (for standard examples) or Running an example with the SoftDevice (for multiprotocol examples).
Running examples
To program the nRF52840 Development Kit, first connect it to your computer with a USB cable. When your board is detected, you can download the example as described below.
Running an example without the SoftDevice
To program the device, run:
To reset the device, run:
For a list of available nrfjprog commands, run:
Optionally, when using GCC, you can type the following commands:
Running an example with the SoftDevice
The SoftDevice is used by the multiprotocol examples.
To write SoftDevice to the device, run:
To write an application to the device, run:
To reset the device, run:
Optionally, when using GCC, you can type the following commands:
Running precompiled Zigbee examples
To quickly test an example without having to install the full toolchain, program a precompiled example application to your development board.
The zip version of the SDK provides precompiled hex files for most of the supplied examples. For examples that require a SoftDevice, the SoftDevice must be flashed separately.
Perform the following steps to program a precompiled example:
- Download the latest
nRF5-SDK-for-Thread-and-Zigbeerepository file in zip format from the SDK download page. - Extract the zip file to the directory that you want to use to work with the SDK.
- Connect the J-Link USB of the board to your computer with a USB cable. The computer will recognize it as a standard USB drive.
- In the SDK directory, navigate to the example that you want to test and open the
hex subdirectory. For example, for the Zigbee CLI Agent example, navigate tonrf5\examples\zigbee\experimental\cli\cli_agent_router\hex. - Select the hex file that corresponds to your development board and copy it to the board J-Link USB drive.
To test the example, follow the testing instructions in the Zigbee examples documentation. Depending on the example that you programmed, it might be sufficient to observe the LEDs on the board. Other examples require you to connect to the board through native USB, SPI, or a phone app.
More information
See the following topics for further introduction into Nordic Semiconductor's ZigBee implementation.