The Simple Network Time Protocol Version 4 (SNTPv4), which is a subset of the Network Time Protocol (NTP), is used to synchronize computer clocks in the Internet. The SNTP client module is is implemented at the Application Layer and uses Nordic's UDP module as transport. The SNTP client also requires the IoT Timer module to be present.
The example application also incorporates Nordic's DNS client module to resolve the hostname of NTP servers to IPv6 addresses.
- Note
- The application requires IPv6 global connectivity in order to communicate with the NTP Server.
The setup of the example application is presented in Figure 1.

Overview
This example demonstrates how Nordic's IPv6 stack can be used for sending an SNTP query and how the response can be processed. The result of a successful query is used to synchronise the local clock with the NTP server.
The hostname of two public NTP servers and the IPv6 address of a DNS server is hardcoded in main.c. Triggered by pressing Button 1 or Button 2, the hostname of one of the servers is first resolved to an IPv6 address. Once a response from the DNS server is received, an SNTP query is sent. If the query is successful, the local clock is synchronised with the NTP server. Local time is kept in the Unix time format and can be obtained by pressing Button 3.
The result of the query and the local Unix time is transmitted through a serial device, and a terminal program (for example PUTTY) can be used to monitor the COM port through a terminal session.
The sequence of messages exchanged between the example SNTP client application and the servers is shown in Figure 2.
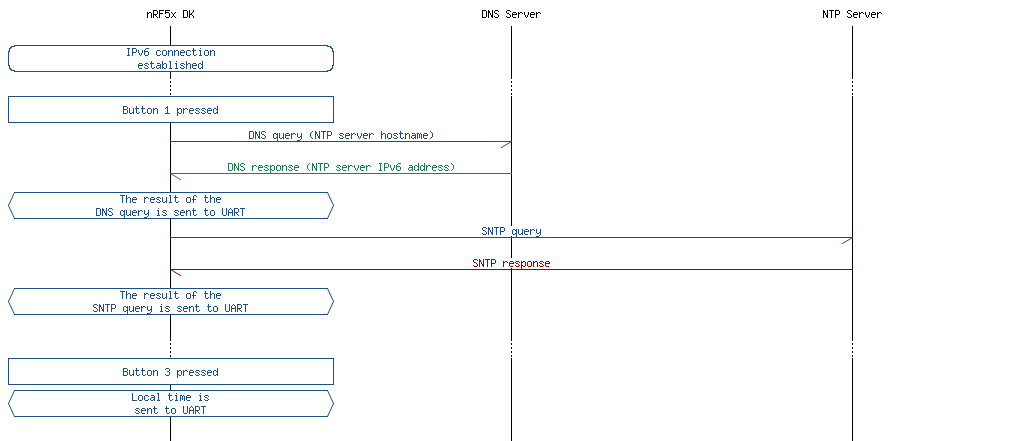
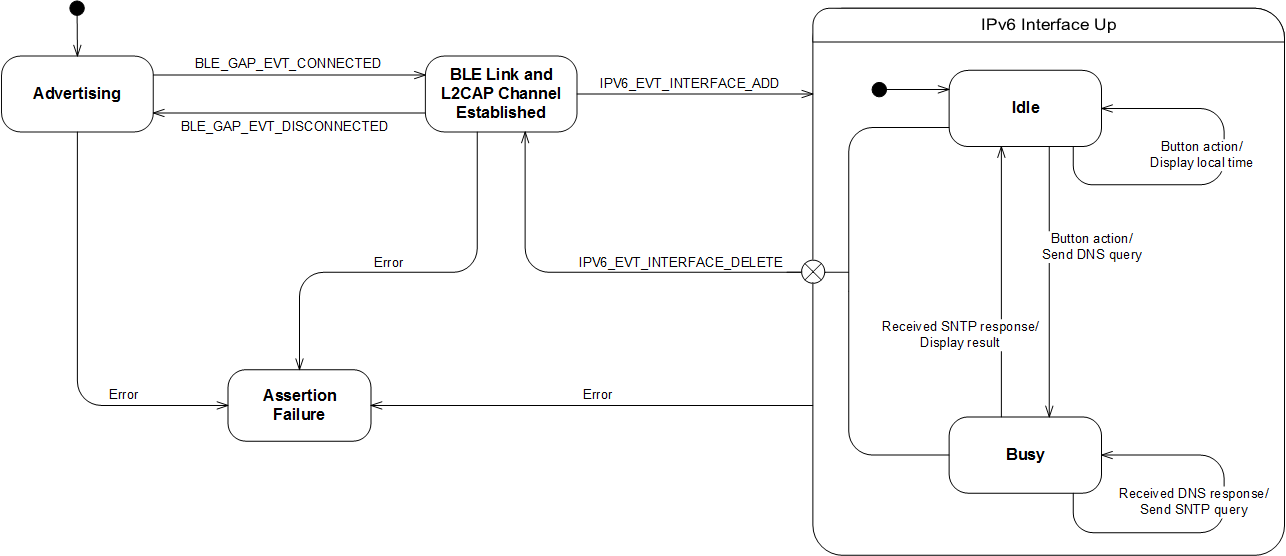
Figure 3 illustrates the states of the application.
- Note
- This application is not power optimized!
Common module dependency and usage
This section summarizes the usage of nRF5x resources and common modules in the examples apart from the IoT 6lowpan and IPv6 stack library.
| Module | Inclusion/Usage | Description |
|---|---|---|
| Timer | 2 | The timer is used to make the LEDs blink on success. |
| Buttons | 3 | Buttons are used for initiating queries and printing local time of day. See Button assignments. |
| LEDs | 4 | LEDs are used to indicate the application states. See LED assignments. |
| Adv Data Encoder | Yes | The device name used is 'SNTP_Client', IPSP Service UUID is included in the UUID list. |
| Scheduler | Yes | Scheduler is used for processing stack events. |
Setup
You can find the source code and the project file of the example in the following folder: <InstallFolder>\examples\iot\sntp
LED assignments
| LED 1 | LED 2 | LED 3 | LED 4 | |
|---|---|---|---|---|
| Blinking | Off | Off | Off | Device advertising as BLE peripheral. |
| On | Blinking | Off | Off | BLE link established, IPv6 interface down. |
| Off | On | Off | Off | IPv6 interface up, the device is idle. |
| Off | On | Blinking | Off | Device busy: DNS query sent, hostname resolution in progress. |
| Off | On | Off | Blinking | Device busy: SNTP query sent, awaiting response. |
| On | On | On | On | Assertion failure in the application. |
Button assignments
| Button 1 | Button 2 | Button 3 |
|---|---|---|
| Commence querying NTP server one. | Commence querying NTP server two. | Get local time. |
- Note
- If commissioning is enabled, additional LED and Button assignments are made.
Testing
See Connecting devices to the router for a list of relevant Linux commands.
- Compile and program the application. Observe that the device is advertising.
- Prepare the Linux router device by initializing the 6LoWPAN module.
- Discover the advertising device by using the hcitool lescan command.
- Connect to the discovered device from the Linux console using the Bluetooth 6LoWPAN connect command.
- Check if the connected state is reflected by the LEDs (LED2 is ON).
- Ensure that the kit has an IPv6 Internet connection.
- Push Button 1 or Button 2 on the kit and keep an eye on your terminal window.
- Observe that the result of the hostname resolution is displayed. If the response is delayed, LED3 will be blinking. If the hostname resolution was successful, an SNTP query will be sent.
- Observe that the result of the NTP query is displayed. If the response is delayed, LED4 will be blinking.
- Push Button 3 on the kit.
- Observe that the local time is displayed.
- Disconnect from the device by using the Bluetooth 6LoWPAN disconnect command.
- Observe that LED1 is blinking and the device is advertising.