- Note
- The OMA Lightweight M2M (LWM2M) defines service architecture for IoT devices and the protocol for device management. Constrained Application Protocol (CoAP) is used as a framework for service definitions and device management procedures. The examples and libraries provided in this SDK demonstrate how you can build an LWM2M type of application. Before building your own product using LWM2M, you should consider the license terms of OMA.
- The IPSO Smart Objects specified by the Internet Protocol for Smart Objects (IPSO) Alliance provides object definitions for common sensor and actuator types. The object definitions reuse the LWM2M service architecture, therefore enabling existing LWM2M libraries and software to be used as infrastructure. The examples and libraries provided in this SDK demonstrate how you can build an IPSO Smart Object type of application. Before building your own product using IPSO Smart Objects, you should consider the license terms of the IPSO Alliance.
The LWM2M client example application demonstrates an LWM2M client that connects to a bootstrap server doing client initiated boostrap and connects to the LWM2M server based on the data written during bootstrap of the device. The bootstrap server address is configured in the example at compile time. If the bootstrap succeeds, it is ready to register with the LWM2M server.
The example allows you to connect to the bootstrap server using secure and non-secure connections. Setting bootstrap security occurs during compile time. However, security settings for the client registers in the LWM2M server depend on the URI written into the device during the bootstrap sequence.
Leshan is used together with the examples provided in this SDK in order to demonstrate a basic client initiatied boostrap and a connection to a LWM2M server. Description on how to set up Leshan bootstrap server and LWM2M standalone server can be found in Setting up the Leshan LWM2M server.
This application as an LWM2M Client, sends CoAP messages to bootstrap or register towards a server on a remote computer, as demonstrated in Figure 1.

- Note
- This application is not power optimized!
- This application will start advertising again after disconnection.
Common module dependency and usage
This section summarizes the usage of nRF5x resources and common modules in the examples apart from the IoT 6LoWPAN and IPv6 stack library.
| Module | Inclusion/Usage | Description |
|---|---|---|
| Timer | 2 | Two timers are used. One for the IoT timer and the other for the button module. |
| Buttons | 3 | Buttons are used for initiating bootstrap and registration requests, as well as DTLS cleanup. See Button assignments. |
| LEDs | 4 | LEDs are used to indicate the application states. See LED assignments. |
| Adv Data Encoder | Yes | The device name used is LWM2M_Client. IPSP Service UUID is included in the UUID list. |
| RNG Driver | Yes | Random number generator is used for security procedures in the DTLS library. |
| Scheduler | Yes | Scheduler is used for processing stack events. |
Setup
The example uses Nordic's IPv6 stack. You can find the source code and the project file of the example in the following folder: <InstallFolder>\examples\iot\lwm2m\lwm2m_client
LED assignments
- LED 1 and LED 2 display the state of the application, as described in the table below.
- LED 3 are lit after bootstrap has succeeded.
- LED 4 is controlled by the IPSO digital output instance exposed by the application. This can be turned on or off by writing to the digital output state resource of the instance.
| LED 1 | LED 2 | |
|---|---|---|
| Blinking | Off | Device advertising as BLE peripheral. |
| On | Blinking | BLE link established, IPv6 interface down. |
| Off | On | BLE link established, IPv6 interface up. |
| On | On | Assertion failure in the application. |
Button assignments
- Button 1: initates a LWM2M bootstrap towards the server URI described in the source code.
- Button 2: initiates a registration towards the LWM2M server instance "1" provided during bootstrapping. This button cannot be used unless bootstrap has succeeded.
- Button 3: terminates the DTLS sessions the application might have created. Subsequent client initiated boostrapping will be possible.
- Note
- If commissioning is enabled, additional LED and Button assignments are made.
Example configuration
The application is by default configured to run in secure mode using DTLS and port 5684 towards the bootstrap server. This can be configured in the application by setting the value of USE_SECURITY in main.c from 1 to 0. Changing this value will also set the default port used for CoAP communication to 5683.
LWM2M Bootstrap Server Set up
In order to provide the application with the needed connection details for the LWM2M server, it has to boostrap. The boostrap server needs to be configured with the right ports so that it matches the application. The default port for a non-secure connection is 5683 and the port for a secure connection is 5684. The set up of the LWM2M server and boostrap server using Leshan is described in Setting up the Leshan LWM2M server.
This example by default assumes that communication is secure using DTLS. The bootstrap server has to be configured to accept the initiated DTLS handshake from the client. The example configuration below should be used for the bootstrap server when running the application with security enabled.
If the example has been configured to run without security enabled, the configuration below should be used for the bootstrap server.
Client Endpoint Credentials
If the example is running in secure mode, it is also necessary to configure the DTLS credentials in the Leshan user interface providing these values. By default the credentials match the one set in the application. The Key translates into "topsecret" when converted from HEX to text.
Testing
See Connecting devices to the router for a list of relevant Linux commands.
- Ensure that the bootstrap server address is set correct in the application.
- Compile and program the application. Observe that the device is advertising.
- Prepare the Linux router device by initializing the 6LoWPAN module.
- Discover the advertising device by using the hcitool lescan command.
- Connect to the discovered device from the Linux console by using the Bluetooth 6LoWPAN connect command.
- Check if the connected state is reflected by the LEDs.
- Run the Wireshark program to monitor the btX interface.
- An ICMPv6 ping can be used on the link-local and on the global IPv6 address assigned to the device to check if the device is reachable.
- Add the two addresses to the network interface created by the Bluetooth 6LoWPAN connection as described in Multiplexing ports.
- Start the bootstrap server and LWM2M server. They should now bind to one address each using port 5683 and 5684.
- Verify that the servers are running.
- Post the object configuration to the bootstrap server using the HTTP interface. If the Bootstrap server startup script has been used, wait for it to respond that the POST has succeeded.
- If secure mode is used, configure the DTLS credentials for the client endpoint using the web interface and the settings in Client Endpoint Credentials.
- Press Button 1 on the board. This will initiate the bootstrap.
- If secure mode is enabled, verify in Wireshark that the DTLS handshake is successfull, and subsequent data packets are transmitted. Otherwise, if the non-secure mode is enabled, verify that the bootstrap is done and a CoAP POST to /bs has been done.
- Observe that LED 3 lights up once the bootstrap is completed.
- Press Button 2 on the board. This will initiate the registration towards the LWM2M server configured during bootstrap.
- If secure mode is enabled, verify in Wireshark that the DTLS handshake is successfull, and that two data packets are transmitted. Otherwise, if non-secure mode is enabled, verify that the registration request as well as the acknowledgement from the server has been completed.
- Open a web browser on the computer running the server and navigate to http://localhost:8080/#/clients.
- Verify that the device has been registered under clients successfully. A link should appear with the text "0a18de70-0ce0-4570-bce9-7f5895db6c70", which is the endpoint id set in the application. The device should appear as shown in Figure 2 below.
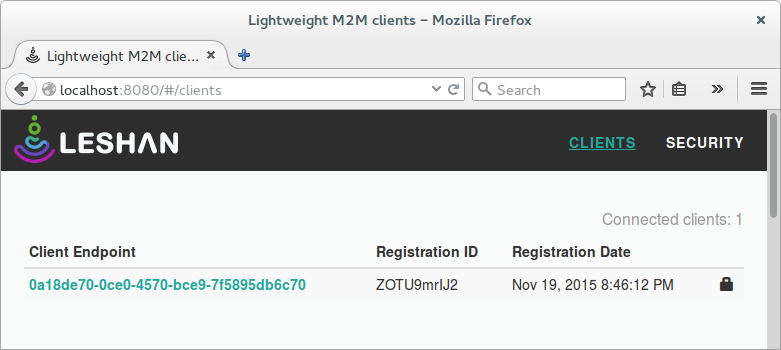 Figure 2. Successfully registered client endpoint with Leshan.
 - Click on the link described by the endpoint id.
- Scroll down to the bottom and locate the IPSO Digital Output object instance. In the Digital Output State resource click Write.
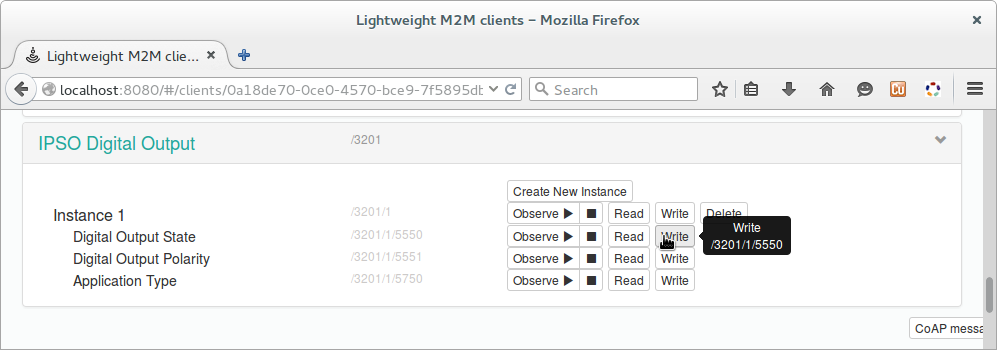 Figure 3. Write button of the "Digital output state" resource in the "IPSO Digital Output" instance.
 - In the text field, type "true". Click Update.
- Observe that LED 4 is lit.
- Disconnect from the bootstrap server and the LWM2M server by pressing Button 3 on the board.
- Disconnect from the device by using the Bluetooth 6LoWPAN disconnect command.
- Observe that only the advertising LED is lit.