The Domain Name System (DNS) is the protocol of the IP stack that enables translating the domain name, for example example.com, to a corresponding set of parameters, such as the IPv6 address.
To demonstrate DNS protocol support on nRF5, Nordic's IPv6 stack is used.
This application implements a simple state machine which queries the DNS Server in order to retrieve the IPv6 address of the given hostname. Right after the response is received, the module starts to send ICMP Echo Requests periodically until the host is reachable. If the maximum retransmission number of ICMP Echo Requests without response is exceeded, the DNS Query is sent again.
- Note
- A demo requires IPv6 global connectivity in order to communicate with the DNS Server.
The demo setup and flow diagram are presented in Figure 1.

Overview
This example demonstrates how Nordic's IPv6 stack can be used for sending a DNS Query and receiving the response packets of the DNS Server.
The state machine of the application is triggered by the BUTTON_1 on the kit and can be stopped by pushing BUTTON_2. The LED configuration indicates the actual state of the process.
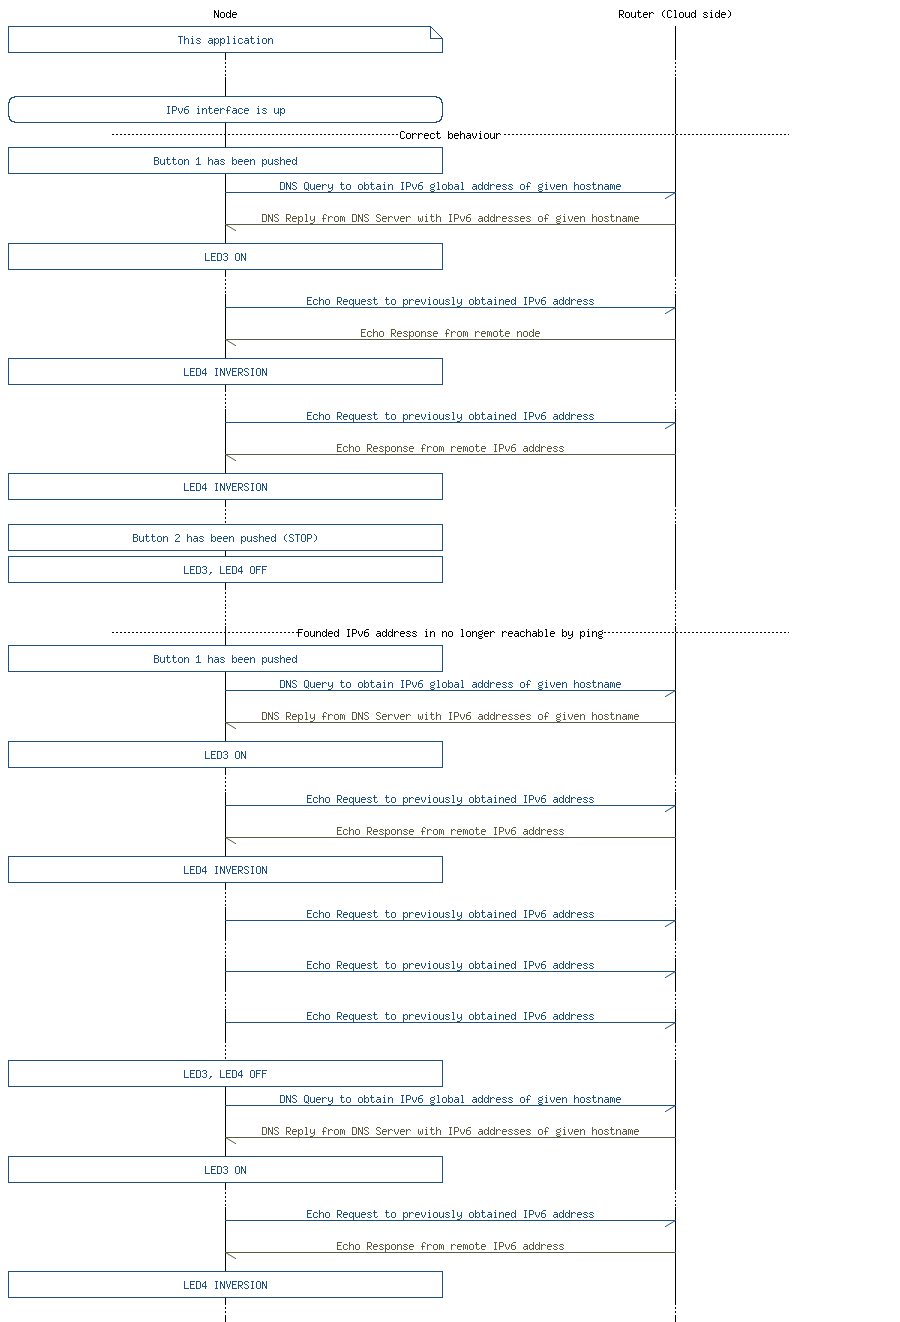
Data Exchange MSC
The MSC below provides an overview of the data exchange in the application between the node (nRF5x) and the router/cloud in two cases:
- Correct behavior
- the IPv6 address associated with the hostname suddenly becomes unreachable (DNS Query is sent again)
Common module dependency and usage
This section summarizes the usage of nRF5x resources and common modules in the examples apart from the IoT 6lowpan and IPv6 stack library.
| Module | Inclusion/Usage | Description |
|---|---|---|
| Timer | 3 | Three timers - IoT timer, button module and for timing ICMP Ping requests. |
| Buttons | 2 | Buttons are used for switching application states. |
| LEDs | 4 | LEDs are used to indicate the application states. See LED assignments. |
| Adv Data Encoder | Yes | The device name used is 'IPv6DNS', IPSP Service UUID is included in the UUID list. |
| Scheduler | Yes | Scheduler is used for processing stack events. |
Setup
You can find the source code and the project file of the example in the following folder: <InstallFolder>\examples\iot\dns\ipv6
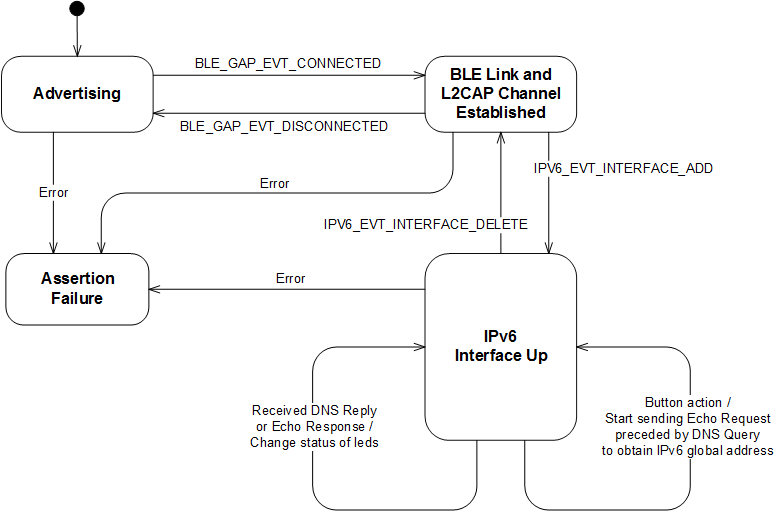
See the short state diagram below that describes the application states.
LED assignments
| Application State | LED 1 State | LED 2 State | LED 3 State | LED 4 State |
|---|---|---|---|---|
| Idle | OFF | OFF | OFF | OFF |
| Advertising | BLINKING | OFF | OFF | OFF |
| IPv6 Interface Up | OFF | ON | OFF | OFF |
| IPv6 Interface Down | ON | BLINKING | OFF | OFF |
| DNS response has been received | OFF | ON | ON | OFF |
| Echo Reply has been received | OFF | ON | ON | INVERT |
| ASSERT | ON | ON | ON | ON |
- Note
- If commissioning is enabled, additional LED and Button assignments are made.
- If the application asserts, it is halted.
- This application is not power optimized!
Testing
See Connecting devices to the router for a list of relevant Linux commands.
- Compile and program the application. Observe that the device is advertising.
- Prepare the Linux router device by initializing the 6LoWPAN module.
- Discover the advertising device by using the hcitool lescan command.
- Connect to the discovered device from the Linux console using the Bluetooth 6LoWPAN connect command.
- Check if the connected state is reflected by the LEDs (LED2 is ON).
- Ensure that the kit has an IPv6 Internet connection.
- Push Button 1 on the kit.
- Observe if LED3 is lit (after several seconds) indicating that a DNS Reply was received.
- Observe if LED4 constantly changes its state (in 2 seconds interval) indicating that an Echo Response was received.
- Push Button 2 on the kit.
- Observe if the LED3 and the LED4 are off.
- Disconnect from the device by using the Bluetooth 6LoWPAN disconnect command.
- Observe that only the advertising LED1 is blinking.