Important: Before you run this example, make sure to program the SoftDevice.
The scalable Encrypted Channels example shows how to set up and use up to 15 encrypted ANT channels on one board.
The example consists of a Transmitter application and a Receiver application. Both applications use the Encryption configuration module. The Receiver application uses the Encryption negotiation module in addition.
Transmitter
The Transmitter application creates the defined number of master channels, configures the encryption settings, and encrypts the channels.
The pattern of the LEDs indicates the number of open transmitting encrypted channels. For example, if four channels are transmitting, the LED pattern is 0100.
You can find the source code and project file of the example in the following folder: <InstallFolder>\examples\ant\ant_scalable_encrypted\scalable_encrypted_tx
Receiver
The Receiver application creates the defined number of slave channels, configures the encryption settings, and starts tracking the respective master channels, which requires negotiating the encryption parameters.
The pattern of the LEDs indicates the number of decrypted channels. For example, if four channels are tracking encrypted master channels, the LED pattern is 0100.
You can find the source code and project file of the example in the following folder: <InstallFolder>\examples\ant\ant_scalable_encrypted\scalable_encrypted_rx
Testing
You can test the Encrypted Channels example in different ways:
Testing the Transmitter with the Receiver
- Compile and program the Transmitter application on one board. Observe that the LED pattern on the board indicates the number of encrypted transmitting channels.
- Compile and program the Receiver application on another board. Observe that the LED pattern on the board indicates the number of channels that have been decrypted.
Testing the Transmitter using AntWare II
- Compile and program the Transmitter application on a board.
- Run AntWare II.
- Open the device panel and enable advanced burst.
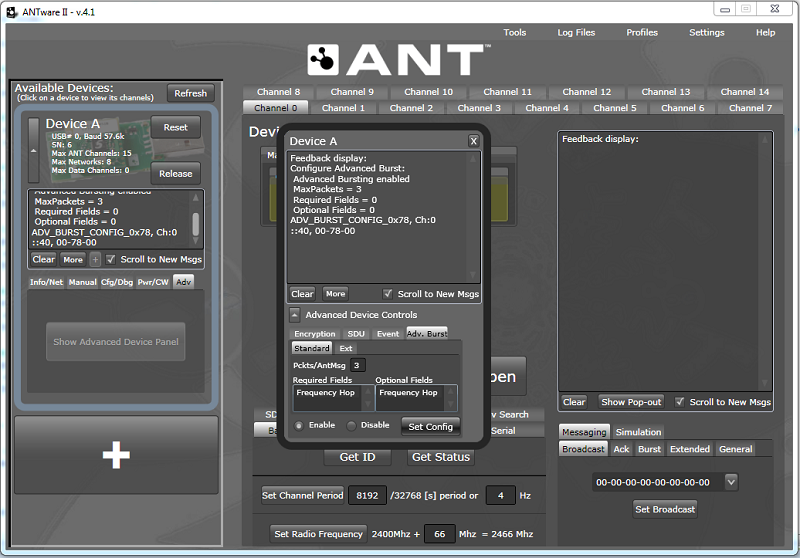 Advanced burst settings
- Set the encryption key to 03-01-04-01-05-09-02-06-05-03-05-08-09-07-09-03.
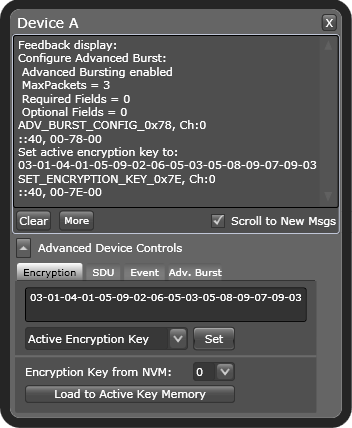 Set the encryption key
- Configure all channels:
- Set the channel assignment to slave.
- Set the channel ID for each channel according to the following table:
Parameter Value Device number Channel number + 1 Device type 2 Transmission type 1 - Set the radio frequency to 2476 MHz.
- Use the default values for all other configuration parameters.
- Open each channel to start transmission.
- Observe that each channel is receiving garbage broadcast messages.
- While each channel is open, enable encryption for the channel.
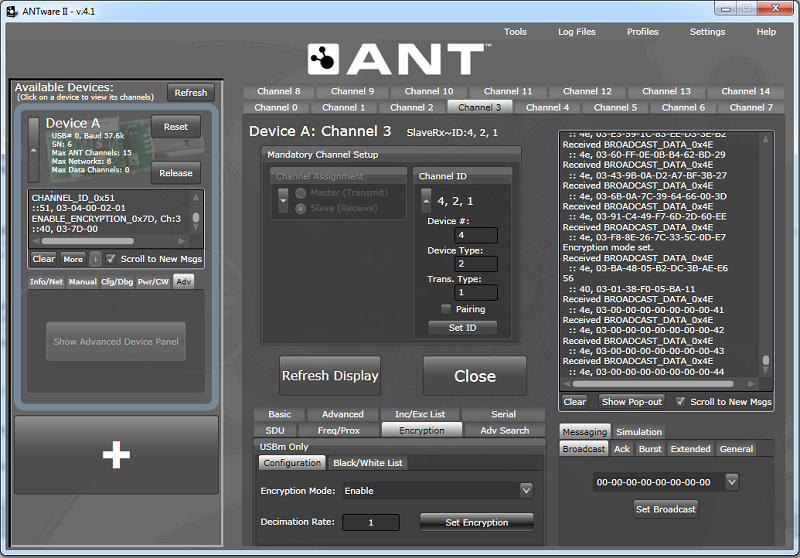 Enable encryption
- Observe that the broadcast messages are decrypted.