This scenario is a default use case.
To update firmware on a connected Thingy, follow the steps below.
-
To start the DFU process:
- iOS: Tap Start in the top right corner of the navigation bar.
- Android: Tap the blue DFU icon in the bottom right corner of the screen to start the DFU process
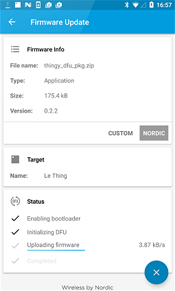
The status of the DFU is highlighted on the tick marks at the bottom of the screen, and the progress bar is updated with the average DFU speed.
iOS Android 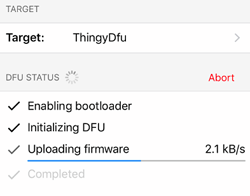
In this mode, the application tries to reconnect to Thingy once the DFU process is completed. However, if this fails, you can always go back to any of the main views and from there you can connect to Thingy as usual. For iOS, see Connecting and disconnecting a Thingy and for Android, see Connecting and disconnecting a Thingy.
Important: (Android) Currently, this DFU procedure uploads a firmware package that is bundled and hardcoded within the mobile application. For future firmware updates, you will be notified of new available firmware through the app. This will allow you to download the latest firmware and flash Thingy with it. Selecting custom firmware is not supported but is planned as a future update.
During the DFU update, you can pause and resume the DFU update from the point when
it was stopped.