Table of Contents
The Thread NFC MeshCoP example demonstrates Thread native commissioning through NFC with the use of OpenThread and Border Router. It uses the on-chip NFC tag that is present on the nRF52 device to initiate a commissioning procedure.
This example implements the CLI interface, so more advanced users can communicate with the node through a serial port and configure it manually. For more information, refer to Thread CLI Example.
- Note
- Unlike other Thread examples, this example is not using the precommissioned parameters specified on the Thread and Thread+BLE examples page.
- The following testing procedure uses the nRF52840 device.
Description
For proper operation, this example must be used along with Nordic's Border Router with the EXPLORE-NFC-WW Raspberry Pi shield.
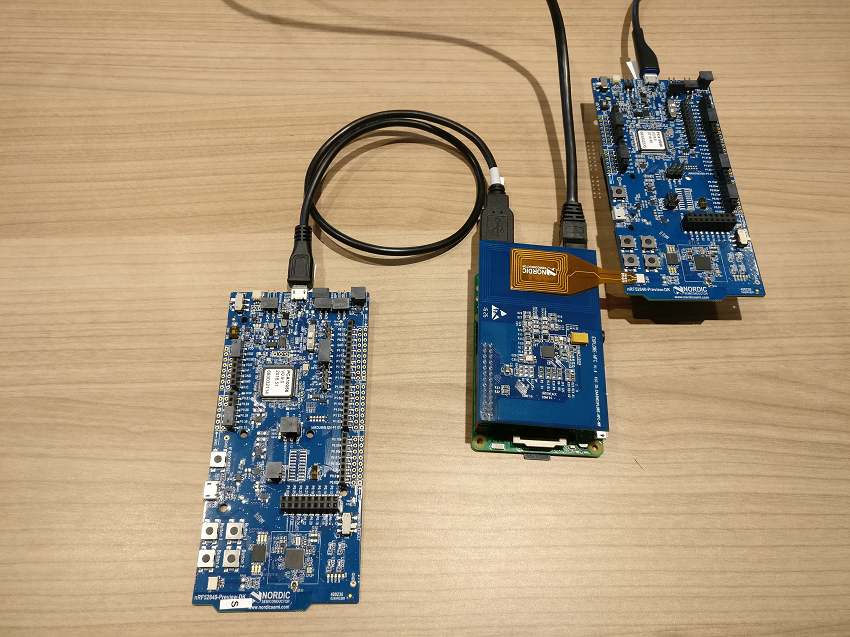
The image below presents the hardware components used in this example:
- Left: nRF52840 Preview Development Kit running the NCP example (part of the Border Router).
- Middle: Raspberry Pi 3 B with NXP Semiconductors’ EXPLORE-NFC-WW shield (core of the Border Router).
- Right: nRF52840 Preview Development Kit with NFC antenna running the Thread NFC MeshCoP Example.
After the border router is booted together with the NFC shield, you can run commissioning. If the device was previously commissioned, you can perform a factory reset to remove any network information. To start the commissioning process, bring the NFC antenna of the device close to the NFC antenna of the border router. You can determine progress of the commissioning with LED1 and LED2.
Commissioning process
On startup, the node will try to automatically connect to the last known network. If it succeeds, the device enters commissioned state. Otherwise, it switches to not commissioned state. In not commissioned state, NFC is enabled as Type 2 Tag with NDEF message containing the commissioning data. After NFC field detection (device is read by the Border Router NFC shield), the node switches to commissioning state, in which it tries to join the network with maximum three attempts. If it succeeds, the device starts network attachment and enters the commissioned state. Otherwise, it falls back to not commissioned state waiting for another NFC read.
Setup
You can find the source code and project files in the following folder: <InstallFolder>\examples\thread\nfc_meshcop.
LED assignments
The example uses LED assignments as described in Thread BSP LED and button reference for the following LEDs:
- LED1 – Used to indicate the network connection state.
- LED2 – Used to indicate the commissioning state.
The following LEDs reserved for user application purposes are assigned in this example:
- LED4: Presence of NFC field.
Button assignments
The following buttons reserved for user application purposes are assigned in this example:
- Button 4: Perform factory reset.
Testing
To test this example, you need the nRF52840 Development Kit and Nordic's Border Router with the EXPLORE-NFC-WW Raspberry Pi shield.
- Build the example according to the instructions in Building examples.
- Program the development kit with the Thread MeshCoP example.
- Connect to the board through UART. The application uses the following UART settings:
- Baud rate: 115200
- 8 data bits
- 1 stop bit
- No parity
- HW flow control: None
- Bring the NFC antenna of the development kit close to the NFC antenna of the Border Router.
- Wait until the device is connected to the network and commissioned (check the states of LED1 and LED2).
- Ping Google DNS server from the development kit: >ping 64:ff9b::0808:0808