Table of Contents
Important: Before you run this example, make sure to program the SoftDevice.
- Warning
- There is an issue in the nRF5 SDK for Thread and Zigbee v4.1.0 that causes higher-than-usual sleep power consumption for all multiprotocol examples when using nRF52840. See workaround on DevZone.
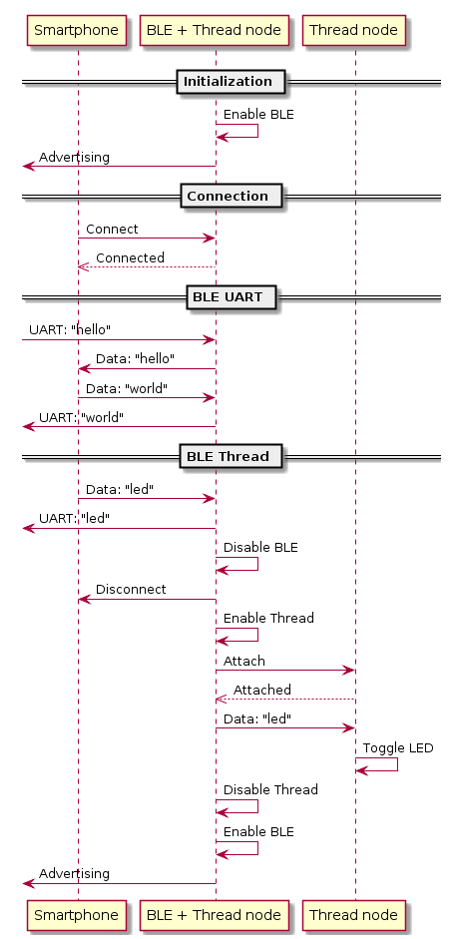
This example application is based on the UART/Serial Port Emulation over BLE example available in nRF5 SDK. It has been modified to support switching between two connection modes, BLE and Thread:
- BLE mode – In this mode, the example works just like
ble_app_uart, using Nordic's BLE UART Service. - Thread mode – In this mode, the node that is running the example application starts attaching to a Thread mesh network. When the attachment procedure succeeds, the node sends a multicast CoAP message to toggle the LED on the
simple_coap_serverexample board. After transmission of the CoAP message, the device switches back to the BLE mode.
The mode is switched from BLE to Thread in the following situations:
- Button 3 is pressed.
- String
ledis received through the Bluetooth connection.
The mode is switched from Thread to BLE in these situations:
- CoAP message containing the LED toggle request is sent.
- Thread timeout expires (10 seconds).
ble_thread_switched_mtd_coap_client and simple_coap_server examplesSetup
You can find the source code and the makefile in the following folder: <InstallFolder>\examples\multiprotocol\ble_thread\ble_thread_swi_mtd_coap_cli
LED assignments
The example uses LED assignments as described in Thread BSP LED and button reference for the following LEDs:
- LED1 – Used to indicate the network connection state (over BLE and Thread).
The LED assignments are different for the following LEDs:
- LED2 – Used to indicate the active network stack:
- Disabled - BLE.
- Solid - Thread.
Button assignments
The following buttons reserved for user application purposes are assigned in this example:
- Button 1 – Wake up from BLE Sleep mode.
- Button 3 – Switch protocol from BLE to Thread.
Testing
The following testing procedure uses the nRF52840 device. It also refers to using an Android smartphone. You can use an iOS smartphone, but some screenshots can differ, pairing popups can appear, and for an iOS app you must ensure to convert all strings to ASCII HEX codes.
- Precondition
- This BLE-Thread switched MTD CoAP client multiprotocol example requires you to run Simple CoAP Server example. For more information about multiprotocol support, see Multiprotocol support with BLE/Bluetooth.
- Prepare two nRF52840 Preview Development Kits and an Android smartphone.
- On the smartphone, install nRF Connect for Mobile.
- Run the following commands to flash the
simple_coap_serverexample to one of the boards and switch it on. LED1 starts blinking (attaching to a Thread network) and, after a few seconds, it turns solid (attached to a Thread network or Thread network created):$ cd <InstallFolder>/examples/thread/simple_coap_server/hex$ nrfjprog -f nrf52 -r --program nrf52840_xxaa_pca10056.hex --chiperase - Build the example according to the instructions in Building examples.
- Flash SoftDevice and the example according to the instructions in Running examples and switch the board on. LED1 starts blinking (BLE advertising).
- Open nRF Connect for Mobile and tap SCAN.
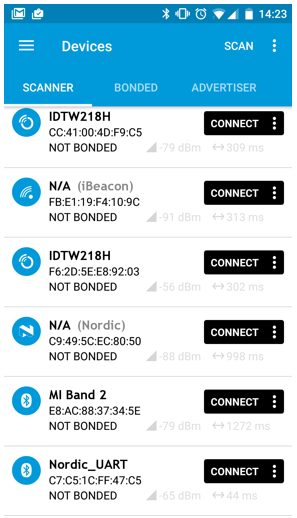 nRF Connect for Mobile
- Note
- To auto-connect to the BLE device after it finishes operation on Thread network, select Use autoConnect in nRF Connect settings.
- Tap CONNECT next to the Nordic_UART device. LED1 on the
ble_thread_switched_mtd_coap_clientshould be solid.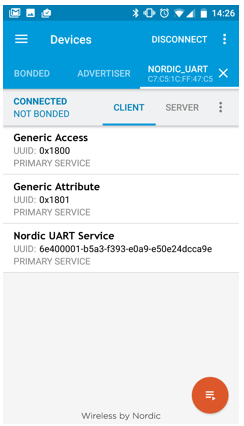 nRF Connect for Mobile
 - Tap Nordic UART Service. The service information appear.
 nRF Connect for Mobile
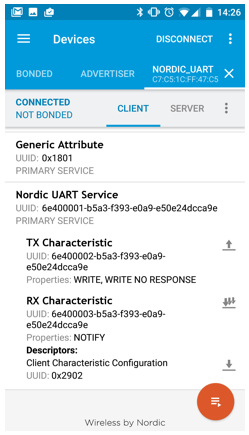
 - Tap the arrow pointing up next to TX Characteristic. The Write value window appears.
 nRF Connect for Mobile
 - Enter the string
ledand tap SEND. The following happens:- LED2 on the
ble_thread_switched_mtd_coap_clientboard switches on for a few seconds and the client board starts the Thread attachment procedure. - When the Thread attachment procedure is finished, the client board sends a CoAP message to the
simple_coap_serverboard through Thread. - When the message is received, the server board toggles LED4.
- The client board disconnects the Thread network and LED2 switches off.
- The client board starts BLE advertising, and LED1 starts blinking.
- LED2 on the
- When the
ble_thread_switched_mtd_coap_clientnode starts advertising again, you can repeat the procedure starting from the step where you open nRF Connect for Mobile and tap SCAN.