Commissioning a Bluetooth Smart node to a 6LoWPAN network is integrated into all example applications in the IoT SDK. This section describes how to enable commissioning in an example application.
Enable commissioning mode and program the application
Choose one of the projects inside the IoT SDK, for example CoAP server.
In order to activate commissioning mode, the following symbol has to be defined for the C preprocessor:
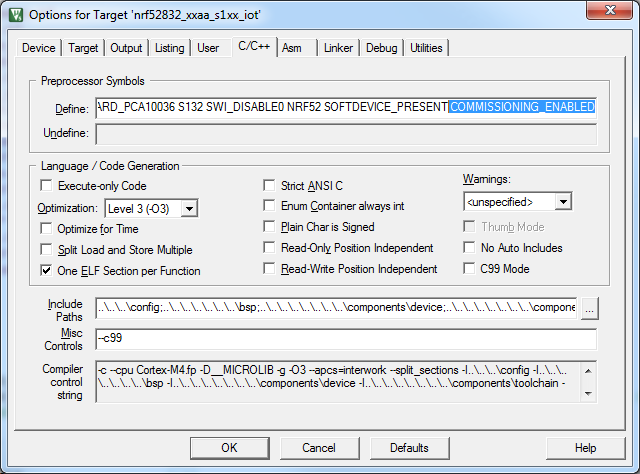
To define the COMMISSIONING_ENABLED symbol in Keil µVision projects, open the Options for Target dialog and select the C/C++ tab. In the Define field, add COMMISSIONING_ENABLED to the end of the define.
To define the COMMISSIONING_ENABLED symbol for the ARM GCC compiler, add the following line in the C flags section of the Makefile:
Now compile the example and flash it to the nRF52 Developer Kit.
Adjust RAM settings
By default, the IoT examples are using a RAM setting which is too small for the commissioning mode compilation. To adjust this, run the example with Serial UART connected and read out the proposed new values from the console log. An example of this can be seen below:

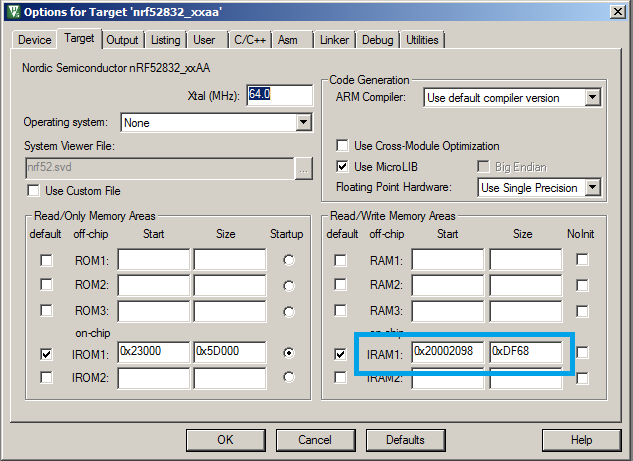
In this example, the new values would be RAM start address 0x20002098 and size 0xDF68.
For Keil projects, open the Options for Target dialog and select the Target tab (default tab). Then, modify the IRAM1 with the new values from the Serial UART log.
For ARM GCC project, open up the corresponding linker script for the project under, for example, iot_ipv6_coap_server_gcc_nrf52.ld in the pca10040/s132/armgcc folder. Modify the MEMORY section with the new RAM values from the Serial UART log. The linker script MEMORY region should look like this:
Now, compile the RAM-adjusted example and flash it to the nRF5 Development Kit.
Button and LED assignments
Once commissioning is enabled, some of the LEDs (LED 3 and LED 4 in most cases) are used to indicate that the node is in Identity mode. Depending on the application, Button 3 or Button 4 is used to erase commissioning-related settings from persistent storage.
- Note
- The commissioning module does not support Raw mode of the persistent storage manager. Therefore, if Raw mode is used by the application, the original Button assignment stays in place.
Prepare the router side
The Linux based daemon has been prepared for the edge router. The current version of the daemon was tested on OpenWRT targets (Chaos Calmer 15.05) and Ubuntu (Linux Kernel 3.18+), and the documentation describes usage on these systems.
The first step is to build and run the bluetooth_6lowpand daemon.
After the daemon is successfully built, start it up and test if the help window is visible.
On an OpenWRT platform with Wi-Fi enabled, the Wi-Fi network configuration can be read and reused by the daemon. In this example, however, the SSID and passphrase will be manually added.
Run the following commands:
- Ensure bluetoothd daemon is turned off. killall bluetoothd
- Reset the HCI interface. hciconfig hci0 reset
- Run the daemon and provide SSID and passphrase as arguments. bluetooth_6lowpand -a Nordic:123456
- Note
- The Linux Kernel does not support BLE Legacy Pairing using OOB - Passkey pairing is used. That means, the passphrase has to have six ascii-digital characters.
-
The router daemon may also be run using init.d script, by executing
/etc/init.d/bluetooth_6owpand start.
Prepare the commissioner
Prepare the Trusted Third Party by installing and running the nRF IoT Joiner Android application.
Configure Wi-Fi manually with the credentials given to the router.
- SSID: Nordic
- Passphrase: 123456
The next step is to find the already advertising nRF device, which should be visible as NodeCFG in the main dashboard of the mobile application. Select the proper device and configure it with the default parameters (10 seconds delay, 20 seconds of timeout). After the configured delay, the node should connect to the network automatically.
Test the application
Test if the pre-flashed application works properly, for example by pinging the commissioned device.