This section describes the software changes that are required when migrating a BLE application from the nRF51 Series to the nRF52 Series. The document assumes that you already have a BLE application running on the nRF51 Series. If you are starting a new development based on the nRF52 Series, please have a look at the nRF52 Series documentation and start with the development kits, SoftDevice and SDK based on the nRF52 Series directly.
Toolchain upgrades
Upgrade every component of the toolchain to the latest version in order to make the toolchain compatible with the nRF52 Series. The latest versions are also backward compatible with the nRF51 Series. This way you can develop an application in parallel for the nRF51 Series and the nRF52 Series with the latest components in the toolchain. The following toolchain components are required for the nRF52 Series:
- nRF5x Tools 7.5.1 or later
- nRFgo Studio 1.20 or later
- MDK 8.0.3 or later
- Master Control Panel 3.9.0 or later
Migrating to BLE S132 SoftDevice
The new S132 SoftDevice developed for the nRF52 Series is based on the S130 SoftDevice for the nRF51 Series. It supports both peripheral and central role concurrently. The API for S132 v1.0.0-3.alpha is aligned with the APIs for S110 v8.x.x, S120 v2.x.x and S130 v1.0.0. If you have an application running on S110 v8.x.x, S120 v2.x.x or S130 v1.x.x, the application should work with the S132 v1.0.0-3.alpha by adjusting the different memory settings as shown in ROM and RAM settings for the S132 v1.0.0-3.alpha SoftDevice. Newer S132 SoftDevices may have different memory settings and/or unaligned API compared with S132 v1.0.0-3.alpha. Refer to the release notes, migration document and SoftDevice Specification for details on any newer version of the S132 SoftDevice version. It is important that you recompile your application with the header files released with the S132 SoftDevice you are using.
Porting a BLE example application from nRF51 SDK the nRF52 Series in Keil
This section describes the steps needed to port the ble_app_hrs example application in nRF51 SDK 8.1.0 to run on nRF52. A customer with a custom application that currently compiles and runs with nRF51 SDK 8.1.0 may find the steps helpful in porting their application to the nRF52 Series. A custom application may, however, need to follow only some of the steps mentioned in this example, or require additional steps, depending on what libraries and drivers are used. The following steps are tailored for Keil IDE but may also apply for developers using other toolchains for nRF5x development.
The following steps describe the changes needed to port the ble_app_hrs example from nRF51 SDK 8.1.0 to nRF52 SDK 0.9.0. If you are starting a new development based on the nRF52 Series, use the template examples provided by the nRF52 SDK, for example ble_app_hrs. This port is chosen here because the nRF52 SDK 0.9.0 is a close successor to the nRF51 SDK 8.1.0, so only minimal changes are required. If you have a more recent version of the nRF52 SDK, you may want to become familiar with the release notes for that specific nRF52 SDK version and add any potential steps to accommodate for changes made from nRF52 SDK 0.9.0. Similarly, if you have an nRF51 SDK version older than 8.1.0, see the nRF51 SDK release notes that represent the changes going from that nRF51 SDK version to nRF51 SDK 8.1.0.
The porting method chosen here is to let the ble_app_hrs example reside inside nRF51 SDK 8.1.0 and make changes to it there in order to port it to the nRF52 Series. You should create a separate copy of nRF51 SDK 8.1.0 to use with the nRF52 Series:
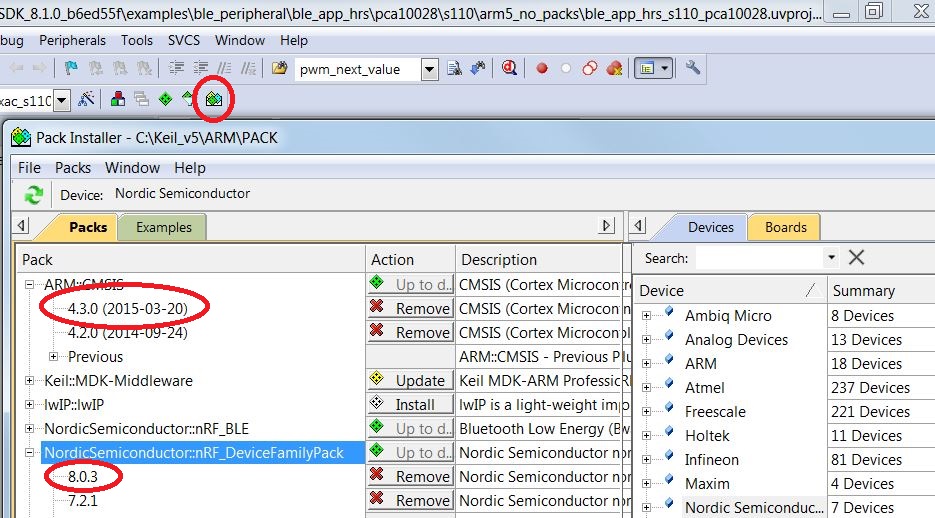
- Install DeviceFamilyPack v8.0.3 or newer, and ARM-CMSIS pack v4.3.0 or newer, as shown
in Selecting packs in Keil.Figure 2. Selecting packs in Keil
- Open the \ble_app_hrs\pca10028\S110\arm5_no_packs\ble_app_hrs_s110_pca10028.uvprojx project, and proceed to step 4.
- (Optional) Port uVision4 Multi-Project by opening
\ble_app_hrs\ble_app_hrs.uvmpw. This step is not needed if
you use the uVision5 project in step 2.
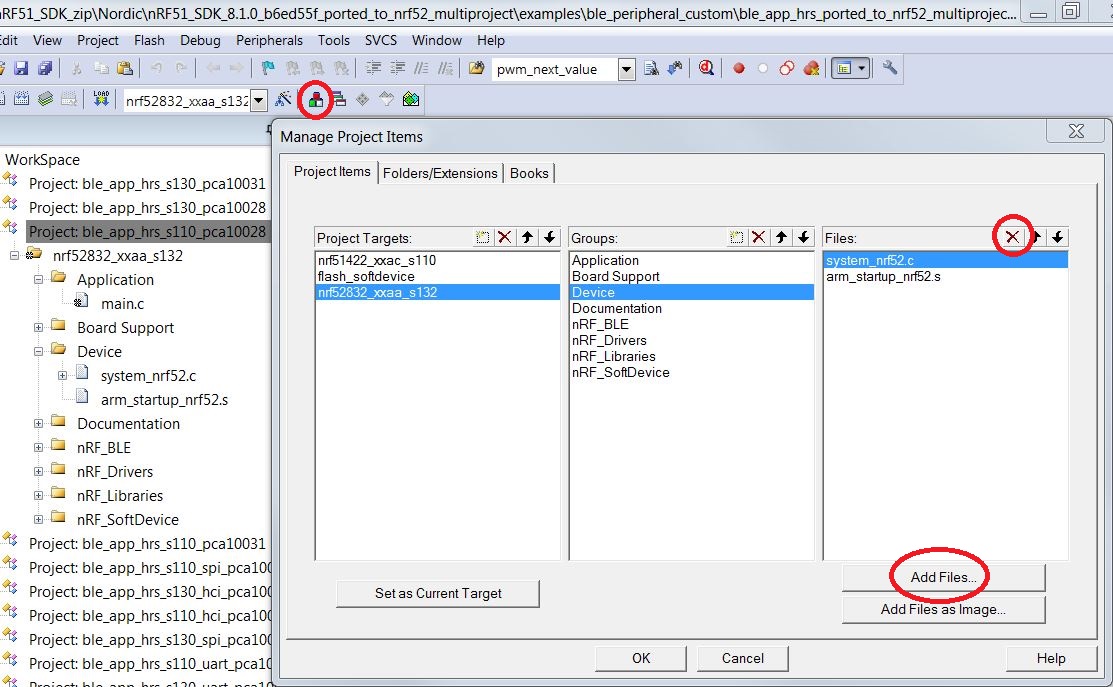
- Remove the nRF51 startup files, that is arm_startup_nrf51.s and system_nrf51.c.
- Copy the nRF52 startup files from nRF52 SDK 0.9.0 into the project. Include the
nRF52 startup files arm_startup_nrf52.s and
system_nrf52.c in the project, as shown in Replacing nRF51 Series startup files with nRF52 Series startup files.Figure 3. Replacing nRF51 Series startup files with nRF52 Series startup files
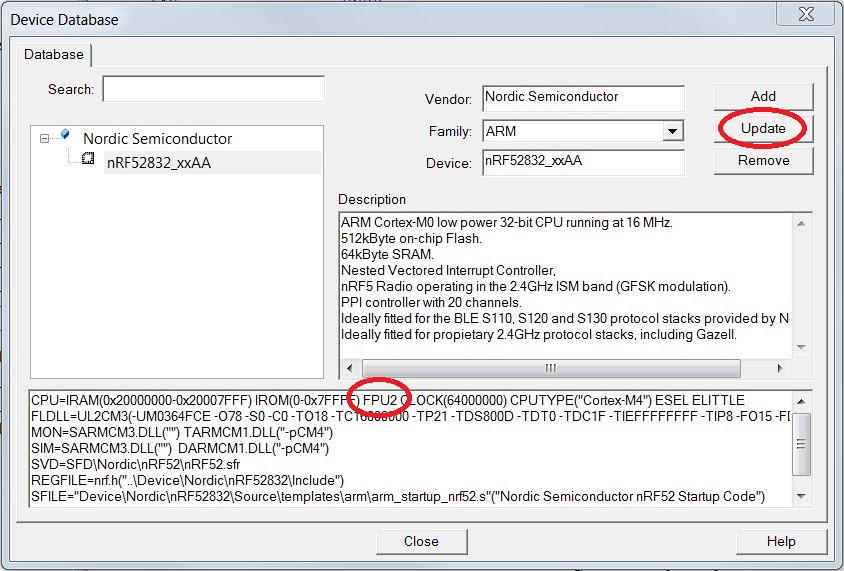
- Select File > Device Database > Nordic nRF52 Series Devices
to set the floating point unit in the nRF52 Device Database, as shown in Setting the floating point unit.Figure 4. Setting the floating point unit
- Select Options for Target > Device tab to set the nRF52832_xxAA device as the target.
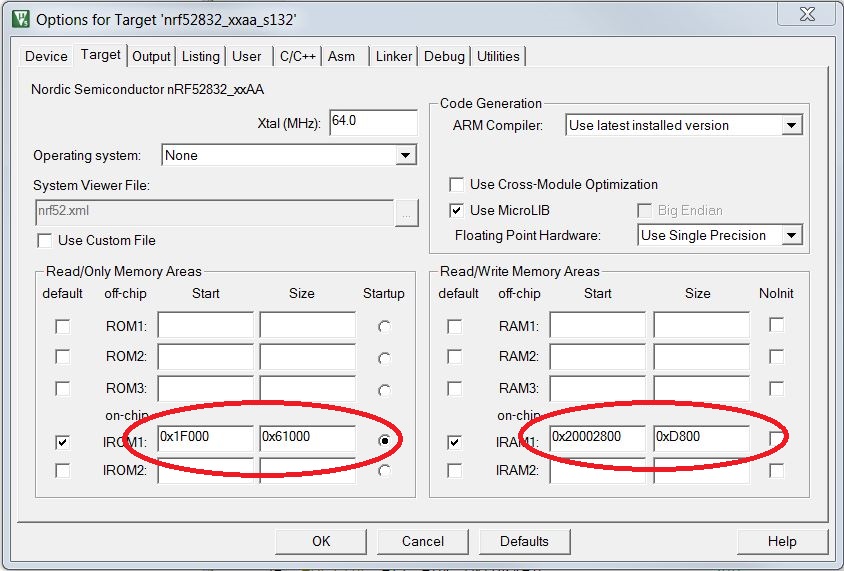
- Configure IROM an IRAM settings for the S132 SoftDevice, as shown in ROM and RAM settings for the S132 v1.0.0-3.alpha SoftDevice.
- Overwrite the following components in nRF51 SDK 8.1.0 with components from nRF52 SDK
v0.9.0:
- \components\device\
- \examples\bsp\
- \components\drivers_nrf\pstorage\
- \examples\ble_peripheral\ble_app_hrs\config\pstorage_platform.h
- Download the S132 SoftDevice and copy the header files into the \nRF51_SDK_8.1.0_ b6ed55f\components\softdevice folder.
- Remove the reference to S110 specific headers in
\components\softdevice\s110\headers, as shown in Removing the reference to S110 specific headers.Figure 5. Removing the reference to S110 specific headers

- Add the reference to S132 headers at \components\softdevice\s132\include and \components\softdevice\s132\include\nrf52.
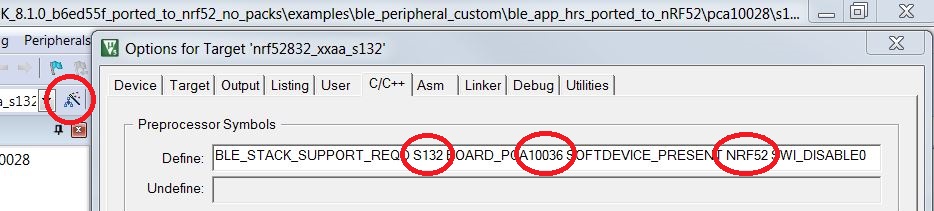
- Update the preprocessor symbols as follows, as shown in Updating the preprocessor symbols:
- NRF51 to NRF52
- PCA10028 to PCA10036
- S110 to S132Figure 6. Updating the preprocessor symbols
- Replace all occurrences of nRF51.h and nrf51_bitfields.h includes (and any other nRF51 specific includes) with nrf.h. You can use Ctrl+Shift+F to find the occurrences in all files.
- Select Options for Target > Debug tab to set J-Link / J-Trace Cortex as the programming/debug interface.
- Select Options for Target > Utilities > Settings > Flash Download tab to specify which Flashing algorithm to use. Here you must remove nRF51xxx and add both nRF52xxx and nRF51xxx_IUCR. The last one is needed if you want to upload content to the UICR.
- In the main.c file, in its
ble_stack_init function, make sure that the SoftDevice is
initialized by adding a new test for the new preprocessor symbol S132. This has to take
place at the same location as you have for the S130
check.
#if defined(S110) || defined(S130) || defined(S132)
    // Enable BLE stack.
    ble_enable_params_t ble_enable_params;
    memset(&ble_enable_params, 0, sizeof(ble_enable_params));
#if defined(S130) || defined(S132)
    ble_enable_params.gatts_enable_params.attr_tab_size = BLE_GATTS_ATTR_TAB_SIZE_DEFAULT;
#endif
    ble_enable_params.gatts_enable_params.service_changed = IS_SRVC_CHANGED_CHARACT_PRESENT;
    err_code = sd_ble_enable(&ble_enable_params);
    APP_ERROR_CHECK(err_code);
#endif