This BLE-Thread dynamic multiprotocol examples require you to run any complementary example on the second board, i.e. an example containing Thread CoAP Server functionality, for example:
The examples come with two variants presenting different BLE pairing options:
- Standard BLE Pairing (BLE Advertising after start)
- BLE Pairing using NFC
This example application is based on the ble_app_uart example available in nRF5 SDK v15.0.0. It has been extended to support dynamic switching between two connection modes, BLE and Thread, at the same time (concurrently). Thread operates on the 802.15.4 radio during Bluetooth low energy radio's inactive time (using Timeslot API). Depending on the Bluetooth low energy connection interval, nRF52840 SoC may spend up to 99% of the radio time on Thread protocol.
This example also supports the Thread MTD CoAP Client role, as described in the MTD CoAP Client example.
The application works similarly to ble_app_uart, utilizing Nordic's BLE UART Service. When a UART command is sent from a mobile phone over BLE, nRF52840 acts as Non-sleepy MTD CoAP Client and sends unicast or multicast CoAP messages to toggle the LED on the simple_coap_server example board.
- Note
- Unlike in the BLE UART and Thread MTD CoAP Client Example, transmitting and receiving data does not break connections from any of the used radio protocols (BLE or Thread).
LED assignments:
- BSP_LED_0: Network state:
- Blinking - BLE advertising
- Solid - Connected over BLE
- BSP_LED_2: Power consumption mode:
- Disabled - SED
- Solid - MED
MTD client button assignments:
- BSP_BUTTON_0: Send a unicast LIGHT_TOGGLE message to the
/lightresource on a paired device. If no device is paired with a specific client node, pressing the button has no effect. - BSP_BUTTON_1: Send a multicast LIGHT_ON or a LIGHT_OFF message (alternatively) to the
/lightresource. Sending a LIGHT_ON/LIGHT_OFF message instead of LIGHT_TOGGLE allows to synchronize the state of the LEDs on several server nodes. - BSP_BUTTON_2: Switch power consumption mode: from MED to SED and from SED to MED.
- BSP_BUTTON_3: Send a multicast pairing request to the
/provisioningresource.
UART command assignments:
- "u" - performs the same operation as BSP_BUTTON_0 (send a unicast CoAP message over Thread)
- "m" - performs the same operation as BSP_BUTTON_1 (send a multicast CoAP message over Thread)
- "p" - performs the same operation as BSP_BUTTON_3 (send a pairing request as CoAP message over Thread)
NFC
One variant of the application shows the usage of the NFC BLE pairing library. The application initializes and starts the NFCT peripheral, which is used for pairing. The application does not start advertising immediately, but only when the NFC tag is read by an NFC polling device, for example a smartphone or a tablet with NFC support. The message that the tag sends to the NFC device contains data required to initiate pairing. To start the NFC data transfer, the NFC device must touch the NFC antenna that is connected to the nRF52 Development Kit.
After reading the tag, the device can pair with the nRF52 device which is advertising. After connecting, the example application behaves in the same way as the example with NFC BLE pairing disabled with one difference. The security level for the Nordic UART Service has been raised to the highest possible level - level 4, so that it is possible for the central device to turn on the UART only after a proper pairing procedure. When the connection is lost due to timeout, the library automatically triggers direct advertising.
The application allows to perform pairing in one of three different modes:
- Legacy Just Works pairing
- Legacy OOB pairing
- LE Secure Connections OOB pairing
Setup
You can find the source code and the makefile in the following folders (with or without BLE NFC Pairing):
- <InstallFolder>\examples\multiprotocol\ble_thread\ble_thread_dyn_mtd_coap_cli
- <InstallFolder>\examples\multiprotocol\ble_thread\ble_thread_dyn_mtd_coap_cli_nfc
Testing
- Prepare two nRF52840 Preview Development Kits and an Android smartphone (you can also use an iOS smartphone).
- On the smartphone, install nRF Toolbox for BLE.
- Run the following commands to flash the
simple_coap_serverexample to one of the boards and switch it on. LED 1 will start blinking (attaching to a Thread network) and, after a few seconds, it will turn solid (attached to a Thread network or Thread network created):$ cd <InstallFolder>/examples/thread/simple_coap_server/hex$ nrfjprog -f nrf52 -r --program nrf52840_xxaa.hex --chiperase - If you choose example with BLE NFC pairing support, please Install micro-ecc. This library is required by the Cryptography library .
- Build the example according to the instructions in Building examples.
- Flash SoftDevice and the example according to the instructions in Running examples and switch the board on.
- Depending on the chosen variant:
- BLE Pairing without using NFC: LED 1 will start blinking (BLE advertising).
- BLE Pairing using NFC: Touch the NFC antenna with a smartphone, tablet, or the complementary central device example. BSP_LED_0 blinks when the NFC tag detects the NFC field.
- Open nRF Toolbox and choose the UART application.
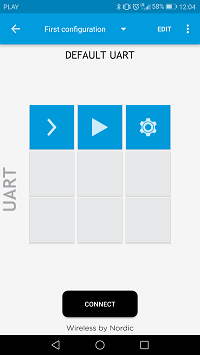 nRF Toolbox - UART application
 - Tap EDIT and create three application buttons.
- Enter command "u" (EOL = LF)
- Enter command "m" (EOL = LF)
- Enter command "p" (EOL = LF)
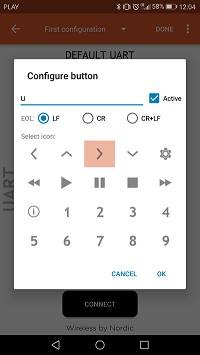 nRF Toolbox - UART application - Configure button
- After all buttons are created, tap DONE.
- If the NFC BLE pairing feature is enabled, touch the NFC antenna with a smartphone and confirm pairing.
- Tap CONNECT and select the Thread_UART device.
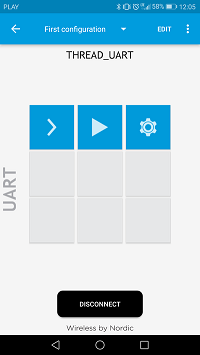 nRF Toolbox - UART application after establishing the connection
 - Observe that BSP_LED_0 is solid, which indicates that BLE connection has been established.
- You can control BSP_LED_3 on every CoAP Server nodes by pressing the middle button ("m" - command) from your smartphone.
- Pair a client with a server. Press BSP_BUTTON_3 on a server node to enable pairing. Then, press the right button in nRF Toolbox ("p" command) to pair the two nodes.
- You can now control the BSP_LED_3 on this server node by pressing the left button in nRF Toolbox ("u" - command).
- You can also control CoAP Servers directly from the nRF52840 Development Kit by pressing BSP_BUTTON_0, BSP_BUTTON_1, or BSP_BUTTON_3.