Important: Before you run this example, make sure to program a SoftDevice.
Before you create your own DFU bootloader, run and test one of the provided DFU bootloader examples to understand the underlying concepts. Start with the basic example that uses BLE as transport protocol. See Running the serial bootloader example for information about the examples that use serial transport.
Setup
You can find the source code and project file of the example in the following folder: <InstallFolder>\examples\dfu\bootloader
LED assignments:
- LED 1: Advertising
- LED 2: Connected
- LED 3: Bootloader mode active
Button assignments:
- Button 4 (during startup): Enter bootloader mode
Programming the DFU bootloader
Complete the following steps to program the DFU bootloader example on your device using Keil:
- Erase the device.
- Program the SoftDevice. See Programming SoftDevices for instructions.
- Compile the project dfu_dual_bank_ble_SoftDevice_board.
- Select Project > Options for Target 'xxx' and make sure that
nrfjprog.exeis configured as the tool for flash programming in the project options. The default J-Link target driver cannot correctly program the bootloader. The example project is preconfigured to usenrfjprog.exe, which is installed with the nRF5 MDK and must be in the Windows system path.
The following screenshot shows the required settings for nrfjprog.exe (for nRF51 Series devices, change "NRF52" to "NRF51"):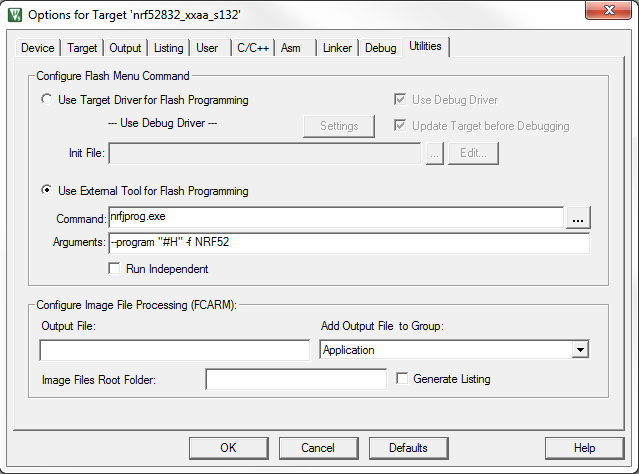 Flash tool configuration in Keil
 - Program the DFU bootloader. If several J-Link emulators are connected, select the one that contains the nRF5 IC that you want to flash.
Updating the device firmware
Complete the following steps to perform a Device Firmware Update:
- Create a firmware file or use one of the supplied example files:
All images are located in theImage Description dfu_test_bootloader_b.zip Zip file containing a bootloader image and the corresponding init packet dfu_test_softdevice_b.zip Zip file containing a SoftDevice image and the corresponding init packet dfu_test_softdevice_w_bootloader_b.zip Zip file containing a combined bootloader and SoftDevice image and the corresponding init packet dfu_test_app_hrm.zip Zip file containing an application image and the corresponding init packet BaseFolder\examples\dfu\ble_dfu_send_hex\test_images_update_nrf5xfolder. If you are using the repository distribution variant of the SDK,BaseFolderisInstallFolder\examples. - Make sure that you are using Master Control Panel v3.8 or later.
- Start the device in bootloader mode. If there is no existing application on the device, the device will be started in bootloader mode automatically. Otherwise, press Button 4 during startup to put the device into bootloader mode. The advertising LED is lit.
- Select the device in Master Control Panel. The device is advertising as "DfuTarg".
- Connect to the device and perform service discovery. Observe that the connected LED is lit and the advertising LED is off. Master Control Panel will recognize that the device supports Device Firmware Update, and the "DFU" button in the user interface will become available.
- Click "DFU" and select the zip file that contains the firmware image.
- Click "Program". Observe that the update procedure starts. When the progress bar reaches 100%, the update is complete.
If an application was transferred, the application is started automatically. Observe that the Advertising LED is lit. If a bootloader or SoftDevice was transferred and no application is installed, the system will restart in bootloader mode.
Verifying the transferred firmware
If you used one of the provided example image files, you can verify that the Device Firmware Update completed as expected as follows:
| Image | Verification |
|---|---|
| dfu_test_bootloader_b.zip dfu_test_softdevice_w_bootloader_b.zip | Open the Master Control Panel. The device is now advertising as "DfuTest" instead of "DfuTarg". |
| dfu_test_softdevice_b.zip dfu_test_softdevice_w_bootloader_b.zip | Check the data at location 0x00003000 by issuing the following command: nrfjprog –memrd 0x3000 –w 32 –n 16 The data has changed to FFFFFF10 51B1E5DB 0001B000 FFFFFFFF. Before the update, the last two bytes were 0078 for the S130 SoftDevice 2.0.0-7.alpha or 0079 for the S132 SoftDevice 2.0.0-7.alpha (other SoftDevices might have a different value). |
| dfu_test_app_hrm.zip | Open the Master Control Panel. The device is now advertising as "Dfu_HRM" instead of "DfuTarg". |
Advanced: IronPython script for DFU
Instead of using Master Control Panel to perform a Device Firmware Update, you can also use an IronPython script. In most cases, using the Master Control Panel is sufficient, but if you need or prefer a command line interface, you can use the IronPython script directly. The script is also used internally when you perform the DFU in Master Control Panel, so the provided functionality is the same.
The script requires IronPython and must be run on a Microsoft Windows operating system. By default, it is located in the C:\Program Files (x86)\Nordic Semiconductor\Master Control Panel\<version>\lib\dfu\ folder.
Before you run the script, determine the device address of the device, which is advertising as "DfuTarg". You can find out the device address in Master Control Panel. However, make sure to close Master Control Panel before you run the script.
The script uses the following syntax:
ipy main.py --file <image_file.zip> --address <target_address>
<image_file.zip>contains the firmware image and the init packet.<target_address>is the address of the device that is advertising as "DfuTarg".