With the help of this SDK, you can set up a Thread Sniffer, which can help you to efficiently analyze Thread network traffic.
During development, you may need to check what kind of data is wirelessly transmitted over the Thread network. With the help of the following instructions, you can set up a sniffer which allows to dynamically monitor the IEEE 802.15.4 wireless traffic. The captured frames are passed to Wireshark which allows to decode the Thread protocol and other protocols that it uses like 6LoWPAN, IPv6, UDP, CoAP, providing complete information about the messages that are sent in the mesh network.
Required hardware
- nRF52840 PCA10056 Development Kit
- PC running a Linux based operating system or MacOS (Ubuntu 17.04 has been tested)
Required software
- Wireshark 2.4.1 or newer
- Python 2.7.10
- nrfjprog - available in nRF5x-Command-Line-Tools
- NCP firmware binary
Obtaining the firmware
To set up the Sniffer, you need the precompiled NCP HEX file with native USB support. The file is delivered with this SDK and can be found in the following directory: <InstallFolder>/examples/thread/ncp/usb/hex
Another alternative to obtain the firmware HEX file is to build it yourself from the OpenThread repository. Note however, that in such case, the LEDs will not indicate the NCP state, because the Board Support Package is only available in the example provided in the SDK.
To compile the HEX file, the following tools are required:
- git
- make
- autotools-dev
- python-setuptools
- gnu-arm-embedded toolchain (e.g. binutils-arm-none-eabi package)
- nrfjprog (from the nRF5x-Command-Line-Tools)
Compiling the HEX file
- Install the necessary tools on Ubuntu Linux. sudo apt-get install git python-setuptools make binutils-arm-none-eabi
- Run the following commands. git clone https://github.com/openthread/openthread.gitcd openthread./bootstrap
- Note
- During testing, the following OpenThread commit has been used to compile the HEX file
- https://github.com/openthread/openthread/commit/ec59d7ef
- Note
- For native USB support, which is recommended due to higher stability, the
USB=1switch is appended to the make command. To use the standard UART transport through the J-Link USB port, you can omitUSB=1.make -f <InstallFolder>/examples/Makefile-nrf52840 MAC_FILTER=1 USB=1arm-none-eabi-objcopy -O ihex <InstallFolder>/output/nrf52840/bin/ot-ncp-ftd output/nrf52840/bin/ot-ncp-ftd.hex
Flashing the firmware
Connect the nRF52840 Development Kit via the J-Link USB port and flash the NCP image.
For the prebuilt HEX found in the SDK:
For the manually built HEX file:
Installing Wireshark
On Ubuntu Linux, run the following commands.
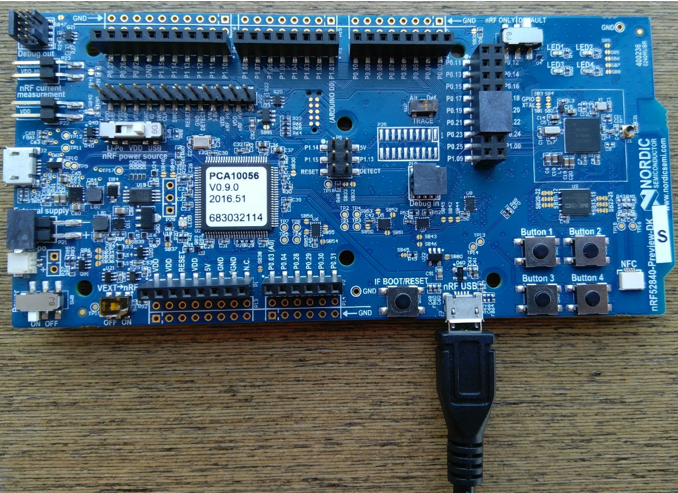
Connecting NCP to the host
Connect the flashed development kit to the host as shown in the image.
- Note
- When the native USB port is used, use the nRF micro USB port and set the nRF power source switch to the USB position, as shown in the image.
Starting Wireshark with the Sniffer
- First, you must clone the pyspinel repository which will be used as an interface between NCP and Wireshark. Pyspinel commit c1ec011826 has been tested. git clone https://github.com/openthread/pyspinel.gitcd pyspinelsudo easy_install pipsudo pip install --user pyserialsudo pip install --user ipaddress
- Start Wireshark. The parameters stand for the following:sudo python ./sniffer.py -c 11 -n 1 -b 115200 --crc -u /dev/ttyACM0 --no-reset | wireshark -k -i -
-c: Thread Channel
-n: Node ID
–crc:Disables the wrong FCS warning resulting from the fact that Nordic radio replaces one byte of CRC with LQI after a packet is received and verified.
–no-reset: Used when NCP is connected via the native USB connection, otherwise this parameter should be omitted.
- Press Ctrl + Shift + P to enter the Wireshark preferences.
- Go to Protocols -> IEEE 802.15.4.
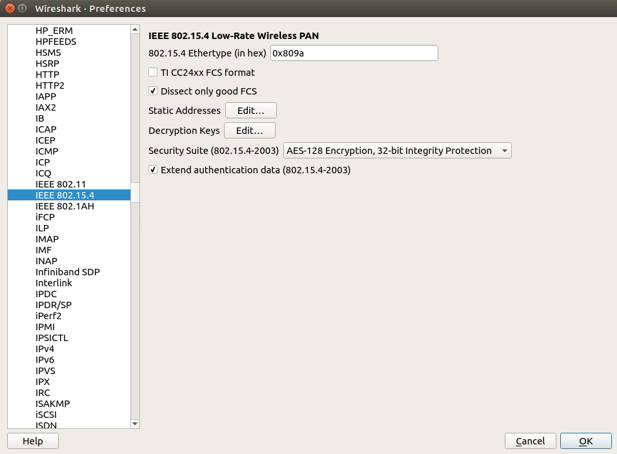 Wireshark Preferences
 - Edit the Decryption Keys.
- Decryption key: 00112233445566778899aabbccddeeff
- Decryption key index: 1
- Key hash: Thread hash
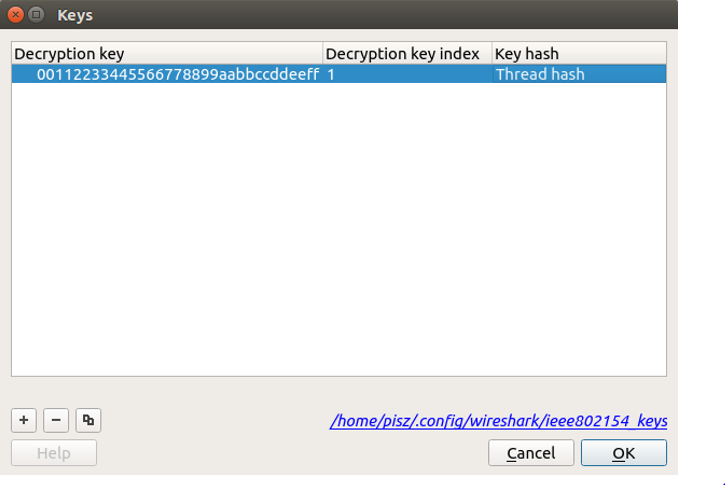 Decryption Keys
- Go to Protocols -> Thread and edit the settings.
- Decode CoAP for Thread: Selected
- Thread sequence counter: 00000000
- Use PAN ID as first two octets of master key: Deselected
- Automatically acquire Thread sequence counter: Selected
- Go to Protocols -> 6LoWPAN and edit the settings.
- Derive ID according to RFC 4944: Deselected
- Context 0: fdde:ad00:beef:0::/64 You can also add additional contexts, for example, for working with Nordic Thread Border Router:
- Context 1: fdff:cafe:cafe:cafe::/64
- Context 2: fd00:64:123:4567::/64
- Context 3: Native IPv6 global prefix that is being propagated in the Thread Network.
Troubleshooting
This section contains some known issues that you can encounter when setting up the Thread Sniffer.
Issue:
"/usr/bin/env: 'python -u': No such file or directory"
Solution:
Instead of running:
, run the following command:
Issue:
"Couldn't run /usr/bin/dumpcap in child process: Permission denied."
Solution:
Change ownership of dumpcap to the current USER group:
Issue:
Solution:
Power cycle the board and run the following command.
Issue:
Solution:
This issue indicates that NCP is not connected or a wrong /dev/ttyACM* is specified, e.g. there are multiple ACM devices connected to the system and the sniffer is visible as /dev/ttyACM1.
Issue:
Sniffing has started but no data is visible in Wireshark, or sniffing has hung and no more data can be observed.
Solution:
When this issue appears, power cycle the board and run the following command.
Additional information
For additional documentation, see Spinel Sniffer Reference on GitHub.