Important: Before you run this example, make sure to program the SoftDevice.
The Buttonless Secure DFU Service Template Application is an example that shows the functionality of running a Buttonless Device Firmware Update using the hardware delivered in the nRF5 Development Kit.
You can configure this template project to either support bonds or not. If the template project is configured to support bonds, the application will exchange bond information with the bootloader, guaranteeing that only bonded devices are allowed to perform DFU operations.
For more information on the Buttonless Secure DFU Service, see Buttonless Secure DFU Service.
Configuration
To enable or disable the support of bonds, modify the configuration parameters in the sdk_config file. For details on editing the SDK configurations, see SDK configuration header file.
When the application starts, the Buttonless Secure DFU Service is initialized.
- Note
- This application is not power optimized!
- The application will stop advertising after 3 minutes and go to System Off mode. Push Button 1 to restart advertising.
Setup
You can find the source code and the project file of the example in the following folder: <InstallFolder>\examples\ble_peripheral\ble_app_buttonless_dfu
Testing
Testing is done by using a pre-generated hex file that contains the following
- Debug version of Secure DFU bootloader
- SoftDevice
- Buttonless Secure DFU template application
- Bootloader settings page generated for the application.
- Note
- The Debug version of the Secure DFU bootloader is compiled with a signature public key that only works with pre-compiled test-images for doing firmware upgrade bundled with this release.
The hex files available for testing have been compiled with or without bond support.
Test the Buttonless DFU Template Application with the nRF Toolbox app, which is available on both iOS (App Store) and Android (Google Play). You can also test the application with nRF Connect by performing the following steps:
Testing Buttonless Secure DFU with bonds.
- Program the precompiled hex file
dfu_test_buttonless_secure_dfu_with_bonds_s132.hexordfu_test_buttonless_secure_dfu_with_bonds_s140.hexusing nrfjprog. - Reset the board and observe that the BSP_INDICATE_ADVERTISING state is indicated.
- Bond to the device using nRF Connect (it is advertising as 'Nordic_Buttonless'). Click the settings button, select "Security Settings", check "Perform bonding", and click "Apply".
- Observe that the BSP_INDICATE_CONNECTED state is indicated.
- Observe that the
Secure DFU serviceis shown in the connected device. Expand the service and observe that the characteristic namedButtonless Secure DFU with bondsis present.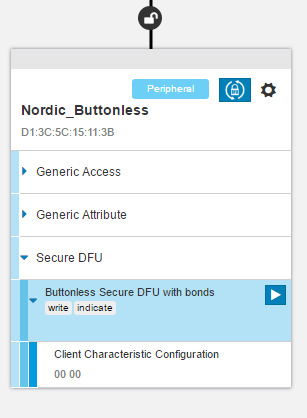 Buttonless Secure DFU with bonds
 - Click the DFU icon to start the Device Firmware Upgrade process. This will open up a window where you can browse to and select a firmware upgrade package to program on the device.
- Pick a test image to program to the device, like
insert_name_s132.ziporinsert_name_s140.zipclickStart DFU.. - Observe the progress indication for the Device Firmware Upgrade.
- If the firmware upgrade is successful, the Device Firmware Upgrade window will close and the device will disconnect.
- Observe that the BSP_INDICATE_ADVERTISING state is indicated.
Testing Buttonless Secure DFU without bonds.
- Program the precompiled hex file
dfu_test_buttonless_secure_dfu_without_bonds_s132.hexordfu_test_buttonless_secure_dfu_without_bonds_s140.hexusing nrfjprog. - Reset the board and observe that the BSP_INDICATE_ADVERTISING state is indicated.
- Connect to the device using nRF Connect (it is advertising as 'Nordic_Buttonless').
- Observe that the BSP_INDICATE_CONNECTED state is indicated.
- Observe that the
Secure DFU serviceis shown in the connected device. Expand the service and observe that the characteristic namedButtonless Secure DFU without bondsis present.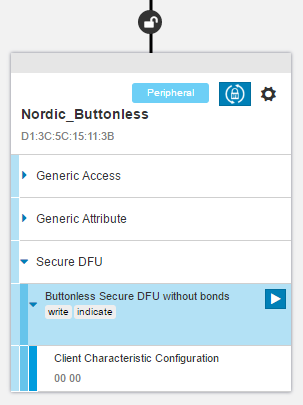 Buttonless Secure DFU without bonds
 - Click the DFU icon to start the Device Firmware Upgrade process. This will open up a window where you can browse to and select a firmware upgrade package to program on the device.
- Pick a test image to program to the device, like
insert_name_s132.ziporinsert_name_s140.zipand clickStart DFU. - Observe the progress indication for the Device Firmware Upgrade.
- If the firmware upgrade is successful, the Device Firmware Upgrade window will close and the device will disconnect.
- Observe that the BSP_INDICATE_ADVERTISING state is indicated.